
Hey there, dessert lovers! 👋 Want to turn your favorite Butterfinger candy bar into something absolutely amazing? You're in for a treat with this Butterfinger cake recipe! Looking for the ultimate Butterfinger cake recipe that'll wow your friends and family? Well, you've just found it!
Imagine the most delicious cake you've ever had, then make it even better - that's what we're baking today! We're taking all that crunchy, peanut buttery Butterfinger goodness and transforming it into a showstopping cake that'll have everyone at your table begging for the recipe. Perfect for birthdays, family gatherings, or just because you deserve something extra special.
Trust me, once you try this irresistible Butterfinger cake recipe with its perfect combination of moist cake, creamy frosting, and crushed Butterfinger pieces, you'll be making it again and again! Ready to create some sweet memories with the best Butterfinger cake recipe ever?

Why You'll Love This Butterfinger Cake Recipe
Let me tell you why this Butterfinger cake recipe is about to become your new favorite thing to bake!
You know that moment when you take a bite of something so good you have to close your eyes and just enjoy it? That's exactly what happens with this cake! First of all, if you love Butterfingers (and who doesn't?), this recipe is like a love letter to your taste buds. We're taking that amazing candy bar crunch and turning it into something even more magical!
The best part? You don't need to be a master baker to make this! Seriously, if you can open a candy bar wrapper, you're already halfway there. 😊 This cake is super forgiving and turns out incredible every single time. It's like the friend who always makes you look good!
Want to be the hero at your next family gathering? Just wait until you walk in with this beauty! The look on everyone's faces when they bite into those layers of moist cake packed with Butterfinger goodness is absolutely priceless. And don't even get me started on how amazing your kitchen will smell while it's baking!
Jump to:
- Why You'll Love This Butterfinger Cake Recipe
- Butterfinger Cake Ingredients
- Butterfinger Cake Instructions
- Prepare the Cake
- Expert Tips and Tricks
- Recipe Variations
- Equipment For Butterfinger Cake Recipe
- Storage Instructions
- Top Tip
- Grandma's Magic Touch: Making the Best Butterfinger Cake Recipe Even Better!
- FAQ
- HOW DID YOUR BUTTERFINGER CAKE RECIPE TURN OUT?
- Related
- Pairing
- Butterfinger Cake Recipe
Butterfinger Cake Ingredients
the Cake:
- 1 box chocolate cake mix
- 3 large eggs
- ½ cup vegetable oil
- 1 cup water
- 1 teaspoon vanilla extract

the Peanut Butter Frosting:
- 1 cup unsalted butter, softened
- 1 cup creamy peanut butter
- 4 cups powdered sugar
- ¼ cup heavy cream
- 1 teaspoon vanilla extract
- ¼ teaspoon salt

the Topping:
- 6 regular-sized Butterfinger candy bars, crushed
- ¼ cup chocolate syrup for drizzling

Butterfinger Cake Instructions
Prepare the Cake
- Preheat your oven to 350°F (175°C). Grease and flour two 9-inch round cake pans.
- In a large mixing bowl, combine the chocolate cake mix, eggs, vegetable oil, water, and vanilla extract.
- Mix with an electric mixer on medium speed for about 2 minutes until well combined and smooth.
- Divide the batter evenly between the prepared cake pans.
- Bake for 25-30 minutes, or until a toothpick inserted into the center comes out clean.
- Allow cakes to cool in pans for 10 minutes, then remove and cool completely on wire racks.
Make the Peanut Butter Frosting
- In a large bowl, beat softened butter and peanut butter until smooth and creamy.
- Gradually add powdered sugar, alternating with heavy cream.
- Beat in vanilla extract and salt until the frosting reaches a smooth, spreadable consistency.
- If needed, add more cream or powdered sugar to achieve desired texture.
Assemble the Cake
- Place one cake layer on your serving plate.
- Spread a thick layer of peanut butter frosting on top.
- Sprinkle with ⅓ of the crushed Butterfingers.
- Place the second cake layer on top.
- Frost the entire cake with remaining peanut butter frosting.
- Press remaining crushed Butterfingers onto the sides and top of the cake.
- Drizzle with chocolate syrup just before serving.
Expert Tips and Tricks
- Freeze your Butterfinger bars for 15 minutes before crushing them - this helps prevent them from becoming too powdery.
- Reserve some larger Butterfinger pieces for the top decoration to showcase the candy bar element.
- Let the cake layers cool completely before frosting to prevent melting.
- Use room temperature ingredients for the frosting to ensure smooth blending.
Recipe Variations
- Butterfinger Poke Cake Version: After baking, poke holes in the warm cake and pour over chocolate pudding before adding the frosting.
- No-Bake Cheesecake Style: Transform this into a Butterfinger cheesecake by using a graham cracker crust and no-bake cheesecake filling.
- Cupcake Alternative: Convert this recipe into 24 cupcakes, adjusting baking time to 18-20 minutes.
Equipment For Butterfinger Cake Recipe
- Two 9-inch round cake pans
- Electric mixer (stand or hand mixer)
- Mixing bowls
- Offset spatula for frosting
- Wire cooling racks
- Food processor or rolling pin (for crushing candy bars)
Storage Instructions
- Store covered at room temperature for up to 3 days
- Refrigerate for up to 1 week in an airtight container
- Freeze unfrosted cake layers for up to 3 months
- Do not freeze the assembled cake as the candy pieces can become soggy
Top Tip
For the perfect texture, don't overbake the cake layers - remove them from the oven as soon as a toothpick comes out clean.
Add crushed Butterfingers just before serving for maximum crunchiness.
Let the cake sit at room temperature for 30 minutes before serving if refrigerated.
Grandma's Magic Touch: Making the Best Butterfinger Cake Recipe Even Better!
You know what makes this classic Butterfinger cake recipe extra special? Those magical little secrets that grandmas just seem to know! If you're ready to take your Butterfinger cake recipe from delicious to absolutely unforgettable, here are some cozy tips straight from grandma's recipe box:
- Before starting your Butterfinger cake recipe, let all your ingredients reach room temperature - grandmas never rush their baking! Those extra 15 minutes make your cake incredibly soft and fluffy.
- When poking holes in your Butterfinger cake, think like grandma - gentle but thorough! Space them a thumb's width apart (as grandma would measure it) so every bite gets that perfect caramel-condensed milk blend.
- Here's grandma's secret for the moistest Butterfinger cake recipe ever: pour that sweetened condensed milk slowly . Take your time, just like she taught us. Each drop should find its own cozy spot in the cake!
- Want to know grandma's special Butterfinger cake trick? Warm your caramel sauce slightly (just 10 seconds in the microwave) before drizzling. It'll spread like a dream and make every slice pure heaven.
- And the most important part of any Butterfinger cake recipe? Grandma always says it's love! Share this cake with people who make your heart smile - desserts taste even better when shared with those we cherish! 🤗
Isn't it wonderful how grandmas always know exactly what makes a Butterfinger cake recipe go from good to absolutely magical? These little touches of love will make your cake taste like it's been passed down through generations! 👵
FAQ
What is a Butterfinger made of?
A Butterfinger candy bar consists of a crispy, layered peanut butter filling enrobed in chocolate. The unique center is made from a mixture of peanut butter and corn flakes that's cooked to create a flaky, crispy texture. The filling is then molded into bars and covered in chocolate coating. The distinctive texture comes from a process called "butterfingering" where the candy is layered repeatedly to create its characteristic crispy, flaky texture.
What is the difference between a butter cake and a regular cake?
A butter cake specifically uses butter as its main fat source, while regular cake can be made with any type of fat (oil, shortening, etc.). Butter cakes have a richer flavor and denser, more tender crumb due to the butter content. The creaming method used in butter cakes, where butter and sugar are beaten together until fluffy, creates a different texture than cakes made with oil or other fats.
What is the history of yellow butter cake?
Yellow butter cake originated in the United States during the 1800s as butter became more readily available. Before then, most cakes were spice cakes or fruit cakes. The development of modern leavening agents like baking powder, combined with fresh butter and farm eggs, created the classic American yellow butter cake. It became especially popular during the Victorian era and remains a birthday cake staple.
Why do you put sour cream in a cake?
Sour cream is added to cake for moisture, tenderness, and richness. The acidity in sour cream helps tenderize the cake's gluten, creating a finer, more tender crumb, while its fat content adds moisture that extends the cake's shelf life. It also reacts with baking soda to help the cake rise and adds a subtle tangy flavor that enhances the overall taste, particularly in chocolate cakes.
HOW DID YOUR BUTTERFINGER CAKE RECIPE TURN OUT?
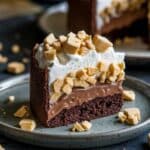
How did your Butterfinger Cake Recipe turn out? Ready to savor something new? This recipe is sure to impress with its perfect balance of rich chocolate cake, creamy peanut butter frosting, and crunchy Butterfinger pieces, creating a decadent dessert that combines everyone's favorite candy bar flavors. If you're a fan of candy-inspired desserts, be sure to try our Crepe Cake Recipe next - another easy-to-make yet delicious treat!
Did you make this Butterfinger Cake Recipe? We'd love to hear about your experience! Leave a star rating and share your thoughts in the comments. Did you try any creative twists or use any unique ingredients? Some bakers have had great success adding a chocolate ganache drip, while others love incorporating crushed Butterfingers into the cake batter. Your feedback not only helps others but also contributes to our growing community of home cooks. Don't forget to share a photo of your culinary creation!
Related
Looking for other recipes like this? Try these:


Pairing
These are my favorite dishes to serve with Butterfinger Cake Recipe


Butterfinger Cake Recipe
Ingredients
Equipment
Method
- Preheat oven to 350°F (175°C). Grease a 9x13 inch baking pan.
- Make cake according to box directions using eggs, oil, and water. Pour into prepared pan.
- Bake for 30-35 minutes or until toothpick comes out clean.
- While cake is still warm, poke holes all over using the handle of a wooden spoon.
- Prepare pudding by whisking pudding mix with milk until smooth. Pour over warm cake, ensuring it fills the holes.
- Refrigerate for 2 hours or until pudding is set.
- Spread Cool Whip evenly over the cake.
- Top with crushed Butterfinger pieces and drizzle with chocolate syrup.


Elizabeth says
Question - has anyone tried using hot fudge instead of caramel sauce?