
This cotton candy cake has become our most requested birthday creation since Liam and I first experimented with it last summer! After perfecting this recipe through many test batches (with Liam eagerly volunteering as chief taste-tester), I've created a cake that perfectly captures that nostalgic carnival flavor while looking absolutely magical. When I made this for Liam's classroom celebration, his teacher actually took photos before cutting it, and three parents asked for the recipe by the end of the day!

Why You'll Love This Cotton Candy Cake
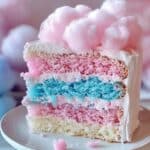
After bringing this showstopper to countless birthday parties, I can tell you exactly why everyone falls in love with this cotton candy cake. First, there's the pure joy factor - the moment people see those swirling cotton candy cake colors and fluffy frosting, their faces light up with childlike excitement. It's not just another cake; it's an experience that brings back carnival memories and makes any celebration feel extra special.
The flavor is what truly sets this cake apart. Unlike novelty cakes that look better than they taste, this one delivers genuine cotton candy flavor in every bite. The cake itself has a light, airy texture with subtle sweetness, while the frosting carries that distinctive carnival sugar taste that's impossible to resist. What surprised me most was how adults love it just as much as kids - my brother-in-law, who claims to "not like sweets," had two slices at our family gathering!
Jump to:
Cotton Candy Cake Ingredients
The Cake Base:
- White cake mix
- Clear vanilla extract
- Cotton candy extract or flavoring
- Milk
- Vegetable oil
- Egg whites
- Gel food coloring in pink and blue

The Dreamy Frosting:
- Unsalted butter
- Powdered sugar
- Heavy cream
- Cotton candy extract
- Vanilla extract
- Gel food coloring
The Magical Decorations:
- Real cotton candy
- Sprinkles
- Edible glitter or shimmer dust
- Pink and blue sugar pearls
- White chocolate drip
See recipe card for quantities.

How To Make Cotton Candy Cake
From countless birthday celebrations and weekend baking adventures with Liam, here's our foolproof method:
Prepare The Cake Batter
- Preheat oven to 350°F and line two 8-inch cake pans with parchment
- Combine white cake mix, milk, oil, egg whites, and cotton candy extract
- Mix until just combined - don't overmix!
- Divide batter into two bowls
- Color one bowl pink and one blue with gel food coloring
Bake The Colorful Layers
- Pour colored batters into prepared pans
- For swirled effect, add alternating spoonfuls of each color
- Gently swirl with a knife for marbled look (Liam's favorite job!)
- Bake 25-30 minutes until toothpick comes out clean
- Cool in pans 10 minutes, then transfer to cooling rack
- Allow to cool completely before frosting
Make Cotton Candy Frosting
- Beat butter until very fluffy (about 5 minutes)
- Gradually add powdered sugar until smooth
- Mix in cotton candy extract and vanilla
- Add heavy cream until light and fluffy
- Divide and color portions pink and blue
- Keep some white if desired for contrast

Assemble Your Magical Cake
- Level cake layers if needed
- Place first layer on serving plate
- Spread with frosting
- Top with second layer
- Apply thin crumb coat and chill 30 minutes
- Frost with final layer in decorative swirls
- Add sprinkles and sugar pearls
- Add cotton candy pieces just before serving
Substitutions
After experimenting with this recipe for various dietary needs and ingredient shortages, I've discovered these reliable substitutions:
Cake Base Options:
- White cake mix → Homemade white cake (for scratch bakers)
- Regular mix → Gluten-free white cake mix
- Oil → Melted butter (richer flavor)
- Whole eggs → Just egg whites (for purer color)
- Cotton candy extract → Vanilla + almond extracts (different but delicious)
Frosting Alternatives:
- Buttercream → Cream cheese frosting (less sweet)
- Heavy cream → Coconut cream (for dairy-free)
- Butter → Plant-based butter (vegan-friendly)
- Powdered sugar → Less sugar + 1 tablespoon meringue powder (more stable)
- Cotton candy extract → Vanilla + berry extract blend
Color Variations:
- Pink & blue → Any pastel combinations
- Traditional → Color matched to party theme
- Gel colors → Natural food dyes (beet/spirulina)
- Vibrant → Subtle watercolor effect
- Two colors → Ombré gradient in one color
Cotton Candy Cake Variations
Unicorn Cotton Candy Cake:
- Add white chocolate horn and ears
- Pipe rainbow-colored mane with frosting
- Use pearlescent sprinkles for shimmer
- Add edible stars and sugar pearls
- Perfect for fantasy-themed parties
Cotton Candy Drip Cake:
- Add white chocolate ganache drip
- Color drip pale pink or blue
- Pile cotton candy high on top
- Add rock candy sticks around sides
- Creates dramatic height and visual impact
Fairy Floss Cupcakes:
- Make cotton candy-flavored cupcakes
- Swirl pink and blue frosting using dual piping bag
- Top with small cotton candy tufts
- Add edible glitter dust
- Perfect for party favors or classroom treats
Carnival Layer Cake:
- Add funfetti sprinkles to batter
- Layer with cotton candy buttercream
- Add carnival-themed candy decorations
- Include caramel popcorn clusters
- Creates complete fair experience in cake form
Cotton Candy Cloud Cake:
- Use ombré frosting technique from white to pink/blue
- Create fluffy frosting clouds on top
- Add cotton candy wisps between clouds
- Dust with iridescent powder
- Gives ethereal, dreamy appearance
Equipment For Cotton Candy Cake
Must-Have Basics:
- Two 8-inch round cake pans
- Parchment paper
- Large mixing bowls
- Electric mixer
- Silicone spatulas
- Measuring cups and spoons
- Cooling rack
- Offset spatula for frosting
Helpful Tools:
- Cake turntable
- Bench scraper
- Piping bags and tips
- Food color gels
- Cake leveler or serrated knife
- Clear cake container
- Small bowls for dividing and coloring batter
Storage Tips
After making this showstopper for countless celebrations, I've learned exactly how to keep it fresh and fabulous:
Room Temperature Storage (1-2 days):
- Store in a cake container with tight seal
- Keep away from humidity and heat
- Avoid refrigerating if possible (dries cake)
- Remove cotton candy garnish if not serving immediately
- Best consumed within 48 hours for optimal flavor
Refrigerator Storage (3-5 days):
- Store in airtight container
- Allow to come to room temperature before serving
- Expect colors to soften slightly
- Add fresh cotton candy just before serving
- Frosting may lose some fluffiness when chilled
Freezer Options (up to 1 month):
- Freeze unfrosted cake layers wrapped in plastic
- Store assembled cake without cotton candy
- Wrap well in plastic, then foil
- Thaw overnight in refrigerator, then counter
- Refresh frosting with spatula after thawing
Top Tip
After making this magical cake for countless birthdays and celebrations, I've discovered the secrets that make the difference between a good cake and a showstopper! First, use gel food coloring instead of liquid drops. Gel colors create those vibrant cotton candy hues without thinning your batter or frosting. The first time Liam and I made this cake, we used liquid food coloring and ended up with pale pastels instead of the vivid carnival colors we wanted. Now we keep a set of gel colors specifically for our cotton candy creations.
Temperature is crucial for both ingredients and serving. Room temperature ingredients blend more smoothly, creating a fluffier cake and creamier frosting. When I'm in a hurry and forget to set out the butter ahead of time, Liam reminds me of our "warm butter, happy cake" rule. For serving, this cake is best enjoyed at room temperature when the flavors are most pronounced - if refrigerated, let it sit out for 30 minutes before serving.
FAQ
How long does cotton candy cake last?
Cotton candy cake stays fresh at room temperature for 1-2 days in an airtight container. If refrigerated, it can last 3-5 days, though the texture is best when brought back to room temperature before serving. The actual cotton candy garnish should always be added just before serving, as it dissolves quickly, especially in humid environments.
What do the British call cotton candy?
The British call cotton candy cake "candy floss" or "fairy floss." When I explained this to Liam, he thought it sounded much more magical! If you're serving this cake to British friends, you might want to call it a Candy Floss Cake for authenticity. The flavors remain the same despite the different name across the pond.
Why is cotton candy so expensive?
cotton candy cake itself is expensive compared to its ingredients because it requires specialized equipment, takes considerable skill to make properly, and is extremely time-consuming to produce in large quantities. The dramatic transformation of a small amount of sugar into a large, fluffy treat also creates a perceived value that exceeds its ingredient cost.
Can sugar and powdered sugar make cotton candy?
Regular sugar or powdered sugar alone cannot make cotton candy without a cotton candy machine. The process requires melting sugar to a precise temperature and spinning it through tiny holes to create the characteristic fine threads. For our cake, we use cotton candy flavoring to recreate the taste without needing specialized equipment.
Ready for a Magical Cotton Candy Creation!
Now you have all the secrets to creating a perfect cotton candy cake that will transport everyone to their favorite childhood carnival! From the vibrant swirled layers to the fluffy cotton candy-flavored frosting, this showstopper dessert combines whimsical visuals with authentic fair-inspired flavor. The way children's eyes light up (and adults too, if we're honest) when they see and taste this cake makes all the effort worthwhile.
Looking for more show-stopping cake ideas? Our Easy 3 Ingredient Caramel Cake delivers rich, buttery flavor with minimal effort - perfect for last-minute gatherings. For a more sophisticated option that still satisfies your sweet tooth, try our Healthy Carrot Cake Cheesecake that combines two beloved desserts in one delicious package. And when fresh fruit is in season, The Best Lemon Blueberry Cake offers bright, tangy flavors balanced with sweet berries for a refreshing treat.
Share your cotton candy cake success! We love seeing your colorful creations and hearing how your family enjoys these magical recipes!
Rate this cotton candy cake and join our cake-loving community!
Related
Looking for other recipes like this? Try these:


Pairing
These are my favorite dishes to serve with Cotton Candy Cake


Cotton Candy Cake
Ingredients
Equipment
Method
- Preheat oven to 350°F (175°C). Line two 8-inch cake pans with parchment paper and grease the sides.
- In a large bowl, combine cake mix, milk, oil, egg whites, and extracts. Mix until just combined (do not overmix).
- Split batter evenly into two bowls. Tint one bowl pink and the other blue using gel food coloring.
- Spoon alternating dollops of each color into the pans. Swirl gently with a knife or skewer to create a marbled effect.
- Bake for 25-30 minutes, or until a toothpick inserted in the center comes out clean. Cool in pans for 10 minutes, then transfer to a rack.
- Beat butter until fluffy (about 5 minutes). Gradually add powdered sugar, then mix in extracts and cream. Beat until light and fluffy. Divide and color frosting as desired.
- Level cake layers if needed. Stack layers with frosting between them. Apply a thin crumb coat and chill for 30 minutes.
- Apply final frosting layer in swirls. Add sprinkles, pearls, and glitter. Top with cotton candy just before serving.


Leave a Reply