
These hostess cupcakes have saved me so many times when I needed something for lunchboxes, bake sales, or just because Liam was having a rough day and needed some comfort food. I used to buy the store-bought ones all the time, but they always tasted kind of fake and left me wanting something better. So I figured out how to make them at home, and honestly, they're way better than anything you can get in a package.
The thing about making your own chocolate cupcakes is that you get to decide what goes in them. No weird stuff you can't pronounce, no artificial flavors that taste like plastic, just real chocolate cake with actual vanilla cream filling and chocolate icing that doesn't taste like wax. Liam was pretty suspicious at first because he's loyal to the original ones, but after he tried mine, he said they were way better and asked me to make them for his birthday party.

Why You'll Love These Hostess Cupcakes
I've been making these Hostess Cupcakes for a couple years now, and they always make people smile. The best thing about them is that they taste like those Hostess Cupcakes you loved as a kid, but way better. You know how sometimes you try something you remember loving and it's kind of gross now that you're older? These are nothing like that. They bring back all those good memories, but they actually taste really good instead of just being okay because you're feeling nostalgic. The chocolate cake stays soft and moist for days instead of getting dry and hard like the store ones do. The cream center is fluffy and sweet but doesn't taste fake or leave that weird aftertaste.
What makes these work for busy families is how easy they are to use. They're perfect for lunch boxes because they don't fall apart or make a mess, and kids actually get excited when they see them. But the thing is, grown-ups like eating them too instead of just pretending they're good because they remind you of being little. I can make a whole batch on Sunday and have snacks for the week, or make them when Liam has friends over and watch them all disappear super fast. They freeze really well too, so I always keep some around for when people drop by or when someone needs cheering up.
Jump to:
- Why You'll Love These Hostess Cupcakes
- Hostess Cupcakes Ingredients
- How To Make Hostess Cupcakes Step By Step
- Storing Your Homemade Hostess Cupcakes
- Substitutions
- Equipment
- Tasty Twists on Classic Hostess Cupcakes
- Top Tip
- Why This Hostess Cupcakes Works
- FAQ
- Ready to Make Childhood Dreams Come True!
- Related
- Pairing
- Hostess Cupcakes
Hostess Cupcakes Ingredients
For the Chocolate Cupcakes:
- All-purpose flour
- Cocoa powder
- Sugar
- Baking soda
- Salt
- Vegetable oil
- Buttermilk
- Eggs
- Vanilla extract
- Hot coffee

For the Cream Filling:
- Butter
- Marshmallow fluff
- Powdered sugar
- Vanilla extract
- Heavy cream
For the Chocolate Topping:
- Semi-sweet chocolate chips
- Butter
- Corn syrup
- Heavy cream
See recipe card for quantities.

How To Make Hostess Cupcakes Step By Step
Make the Chocolate Cupcakes First
- Preheat oven to 350°F and line cupcake tin with paper liners
- Mix all dry ingredients in large bowl until no lumps remain
- Whisk together oil, buttermilk, eggs, and vanilla in separate bowl until smooth
- Add wet ingredients to dry and mix until just combined - don't overbeat
- Slowly stir in hot coffee (batter will be thin but that's normal)
- Fill cupcake liners about ⅔ full and bake 18-20 minutes until toothpick comes out clean
Create the Perfect Cream Filling
- Beat room temperature butter until light and fluffy, about 3-4 minutes
- Add marshmallow fluff and beat until combined and smooth
- Gradually add powdered sugar, then vanilla and cream
- Beat until filling is light, fluffy, and holds its shape when piped
- Transfer to piping bag or squeeze bottle for easy filling
Fill and Top Your Cupcakes
- Let Hostess Cupcakes cool completely before filling or they'll fall apart
- Use sharp knife to cut small cone-shaped piece from center of each cupcake
- Pipe cream filling into each hole, then replace cake top piece
- Melt chocolate chips with butter, corn syrup, and cream until smooth
- Spoon chocolate over each cupcake and use toothpick to make signature squiggle
Final Assembly
- Let chocolate topping set for about 30 minutes before serving
- Store in airtight container at room temperature for up to 5 days
- For best results, fill cupcakes day you plan to serve them
- Chocolate topping can be made ahead and reheated gently if needed
Storing Your Homemade Hostess Cupcakes
I've learned the hard way what keeps these Hostess Cupcakes fresh and what turns them into disappointing mush. Here's what actually works:
Room Temperature Storage (Best Option):
- Store in airtight container for up to 5 days
- Don't refrigerate unless your kitchen is really hot - the filling gets hard and weird
- Layer parchment paper between stacked cupcakes to prevent sticking
- Keep away from heat sources that could melt the chocolate topping
Make-Ahead Strategy:
- Bake cupcakes up to 2 days ahead and store unfilled
- Make filling day you plan to assemble them for best texture
- Chocolate topping can be made ahead and gently rewarmed
- Fill cupcakes same day you're serving for freshest taste
Freezing Tips:
- Freeze unfilled cupcakes wrapped individually for up to 3 months
- Don't freeze filled cupcakes - the cream gets weird and watery when thawed
- Thaw frozen cupcakes completely before filling and topping
- Chocolate topping freezes well separately and can be reheated
What Not to Do:
- Don't store these in the fridge - the cake gets dry and the filling gets too firm
- Don't stack them without parchment paper or they'll stick together
- Don't fill them more than a day ahead or the cake gets soggy
- Don't leave them uncovered or the chocolate topping will get dusty and dull
For Travel:
- Pack in single layer in container with tight lid
- Use cupcake carrier if you have one to prevent squishing
- Fill just before leaving if possible to avoid soggy bottoms
- Bring extra napkins because people always underestimate how messy they can be
Substitutions
Over the years, I've had to make these Hostess Cupcakes work with whatever I had on hand or for people with different dietary needs. Here's what actually works:
For Different Dietary Needs:
- Gluten-free flour blend → All-purpose flour (use 1:1 ratio, texture stays almost the same)
- Dairy-free butter → Regular butter (use same amount for filling and topping)
- Almond milk + vinegar → Buttermilk (mix 1 cup almond milk with 1 tablespoon vinegar)
- Coconut cream → Heavy cream (works great in both filling and chocolate topping)
When You're Missing Ingredients:
- Regular milk + lemon juice → Buttermilk (1 cup milk with 1 tablespoon lemon juice, let sit 5 minutes)
- Powdered sugar → Regular sugar (blend 1 cup sugar in blender until powdered)
- Marshmallow fluff → Mini marshmallows (melt 2 cups minis with 2 tablespoons water)
- Semi-sweet chips → Dark chocolate (chop up chocolate bar, use same amount)
For Health-Conscious Versions:
- Applesauce → Half the oil (replace half oil with equal amount unsweetened applesauce)
- Greek yogurt → Some of the butter in filling (use ¾ butter, ¼ Greek yogurt)
- Stevia blend → Sugar (follow package directions for equivalent sweetness)
- Whole wheat pastry flour → All-purpose flour (cupcakes will be denser but still good)
Equipment
- Standard cupcake tin
- Paper cupcake liners
- Electric mixer
- Large mixing bowls
- Piping bag or squeeze bottle for filling
Tasty Twists on Classic Hostess Cupcakes
Golden Vanilla Version:
- Replace cocoa powder with extra flour for vanilla cupcakes
- Keep the same cream filling but add extra vanilla extract
- Top with vanilla glaze instead of chocolate for lighter option
- Perfect for people who aren't huge chocolate fans but love the nostalgic feel
Strawberry Surprise:
- Add strawberry extract to the cream filling for pink color and berry flavor
- Use freeze-dried strawberries crushed up in the cake batter
- Top with white chocolate instead of dark for pretty contrast
- Kids go crazy for these at birthday parties
Peanut Butter Paradise:
- Swirl peanut butter into the cream filling before piping
- Add peanut butter chips to the chocolate cake batter
- Drizzle melted peanut butter over the chocolate topping
- Warning: these are seriously addictive and hard to stop eating
Coffee Shop Style:
- Add instant coffee powder to both cake batter and cream filling
- Use espresso instead of regular coffee in the batter
- Dust finished Hostess Cupcakes with cocoa powder for fancy look
- Great for grown-up parties where you want something more sophisticated
Holiday Versions:
- Peppermint extract in filling with crushed candy canes on top for Christmas
- Orange extract and food coloring for Halloween themed treats
- Red velvet cake with cream cheese filling for Valentine's Day
- Lemon cake with lemon filling for spring celebrations

Top Tip
- The perfect filling needs to hold its shape when you pipe it but still be soft enough that you can actually bite through it without it being like chewing on cold butter, which is disgusting. But if it's too runny, it squirts out all over the place when you bite down, and then what's the point of having that nice clean center? I probably ruined twenty batches before I figured out what I was doing wrong every single time.
- Here's how I test it now: when you pull the beaters out of the filling, it should make soft peaks that hold for maybe 5 seconds and then slowly melt back down. If it makes stiff peaks that stick around forever, add a little more cream. If it won't make peaks at all, keep beating it or add more powdered sugar. The whole thing should feel light and fluffy, not thick and heavy like frosting.
- The timing thing is really important too. You have to beat the butter really well first until it's super light and fluffy - like 4 or 5 minutes, not just a quick mix. Then add the marshmallow stuff and beat that until it's completely smooth with no lumps. Only after that do you add the powdered sugar and cream. If you try to rush any of these steps, it won't turn out right and your Hostess Cupcakes will be disappointing instead of something people actually want to eat.
Why This Hostess Cupcakes Works
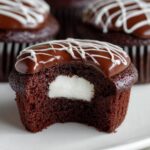
The cream filling is where these really beat the packaged version. Marshmallow fluff gives you that light, fluffy texture that everyone remembers from being a kid, but mixing it with real butter and cream makes it taste like something you actually want to eat instead of just sugar and mystery chemicals. The powdered sugar makes it sweet without being gritty, and real vanilla extract makes it taste like actual vanilla instead of that fake stuff that leaves a weird aftertaste. When you bite into these, the filling is smooth and creamy, not gritty or plasticky like the store ones sometimes are.
The chocolate topping works because we use real chocolate chips instead of whatever waxy coating they slap on the packaged ones. Adding corn syrup makes it shiny and smooth like the original, but using butter and cream keeps it from getting hard and gross when it cools down. It stays soft enough that you can bite through it easily but firm enough to hold that squiggle shape that makes them look right. Plus, it actually tastes like chocolate instead of leaving that weird coating feeling in your mouth that the store-bought ones do sometimes.

FAQ
What happened to Hostess cupcakes?
Hostess went through bankruptcy in 2012 but came back under new ownership. The Hostess Cupcakes are still available in stores, but many people think the recipe changed and they don't taste quite the same as the original versions from years ago.
What is the oldest snack cake in the US?
Hostess CupCakes were first introduced in 1919, making them one of the oldest packaged snack cakes in America. They originally came without the signature white squiggle, which wasn't added until 1950 to make them look more distinctive on store shelves.
What is the filling in a Hostess CupCake made of?
The original filling is made from sugar, water, corn syrup, and various stabilizers to create that fluffy texture. Our homemade version uses butter, marshmallow fluff, powdered sugar, and cream for a much cleaner ingredient list that tastes way better.
Who bought out Hostess cupcakes?
After Hostess Cupcakes Brands went bankrupt in 2012, the company was bought by Apollo Global Management and Metropoulos & Co. They relaunched the brand in 2013, but many fans say the taste and texture aren't quite the same as the original pre-bankruptcy versions.
Ready to Make Childhood Dreams Come True!
Now you've got everything you need to make hostess cupcakes that are way better than anything you can buy in a store. Seriously, once you try these, you'll wonder why you ever bothered with the packaged ones that taste like cardboard and fake vanilla. From getting that cream filling just right to making chocolate topping that actually tastes like chocolate instead of waxy junk, these Hostess Cupcakes prove that the best versions of the stuff you loved as a kid are usually the ones you make yourself. They're perfect for lunch boxes, after-school snacks, bake sales, birthday parties, or just because it's Tuesday and everyone needs something good.
Want more treats that bring back good memories but taste even better homemade? Check out our Easy Pumpkin Cheesecake Truffles Recipe that turns fall flavors into perfect little bites that look fancy but are actually pretty easy. Our The Best Oatmeal Fudge Bars Recipe makes those chewy, chocolatey bars that disappear super fast and always get people asking for the recipe. And our Easy Homemade Cherry Amaretto Tiramisu takes a fancy restaurant dessert and makes it totally doable for regular people who want to show off a little without spending their whole day in the kitchen!
Share your Hostess Cupcakes wins with us! we really do love seeing how these work out for other families and hearing about what changes you make to fit your own taste. It's so cool when a recipe travels from one kitchen to another and becomes part of someone else's regular rotation.
⭐️⭐️⭐️⭐️⭐️ Rate this Hostess Cupcakes and join our baking crew!
Related
Looking for other recipes like this? Try these:


Pairing
These are my favorite dishes to serve with Hostess Cupcakes


Hostess Cupcakes
Ingredients
Equipment
Method
- Preheat oven to 350°F (175°C), line cupcake tin with liners, mix dry ingredients in one bowl, wet ingredients in another, combine them, then stir in hot coffee until batter is smooth.
- Fill liners ⅔ full and bake 18-20 minutes until a toothpick comes out clean; cool cupcakes completely.
- Beat butter until fluffy, mix in marshmallow fluff, add powdered sugar, vanilla, and cream until filling is light with soft peaks.
- Core each cupcake, pipe filling inside, and replace cake tops.
- Melt chocolate chips, butter, corn syrup, and cream until smooth, spoon over cupcakes, add white squiggle if desired, and let set 30 minutes.


Leave a Reply