
This tiramisu brownies are the answer to that dessert dilemma you didn't even know you had! I discovered this recipe after a trip to Italy left me obsessed with tiramisu, but my American sweet tooth still wanted that dense chocolate satisfaction only brownies can deliver. The result? An dessert that combines the best of both worlds-rich, coffee-infused chocolate brownies topped with a cloud-like mascarpone cream that'll make you close your eyes and sigh with every bite. Perfect for impressing dinner guests or treating yourself on a cozy night in, these tiramisu brownies bring a touch of Italian elegance to a classic American treat without complicated techniques or hard-to-find ingredients.

Why You'll Love This Tiramisu Brownies
Trust me when I say these tiramisu brownies will become your new go-to dessert for just about any occasion. The bottom layer gives you that perfect brownie texture-slightly fudgy in the center with a paper-thin crackly top-while the mascarpone cream brings all the sophisticated flavor of a traditional tiramisu without the fuss of dealing with ladyfingers.
What makes this recipe truly special is how impressive it looks despite being surprisingly straightforward to make. While scrolling through recipes on Instagram and TikTok, you'll see plenty of complicated versions, but this one gives you that same "wow factor" without requiring pastry chef skills. And unlike the vegan tiramisu brownies you might have spotted online, this classic version delivers that rich, authentic flavor that perfectly balances chocolate and coffee notes.
If you've tried the viral recipe by ROSIE or drooled over the tiramisu brownies from teakandthyme, you'll appreciate how this recipe captures that same gorgeous layered effect but with ingredients you likely already have on hand. No need to search for "tiramisu brownies near me" when you can create this bakery-worthy treat right in your own kitchen!
Jump to:
Ingredients
For the Brownie Base:
- Unsalted butter
- Granulated sugar
- Large eggs
- Vanilla extract
- All-purpose flour
- Unsweetened cocoa powder
- Salt
- Instant espresso powder
- Kahlua or coffee liqueur

For the Mascarpone Layer:
- Mascarpone cheese, room temperature
- Mranulated sugar (or powdered sugar for a smoother texture)
- Vanilla extract
- Vnstant espresso powder dissolved in 1 tablespoon hot water
- Heavy whipping cream
- Cocoa powder for dusting
See recipe card for quantities.

Tiramisu Brownies Instructions
Preparing Your Brownie Base
- Preheat your oven to 350°F (175°C) and line a 9×13-inch baking pan with parchment paper, leaving overhang on the sides for easy removal.
- Melt the butter in a medium saucepan over low heat or in a microwave-safe bowl.
- Whisk the sugar into the melted butter until well combined. The mixture should look slightly grainy but glossy.
- Add eggs one at a time, whisking thoroughly between each addition. This creates that perfect crackly brownie top that so many TikTok tiramisu brownie videos showcase.
- Stir in the vanilla extract.
- Combine the flour, cocoa powder, salt, and espresso powder in a separate bowl.
- Fold the dry ingredients into the wet ingredients until just combined. Don't overmix-this is key to fudgy rather than cakey brownies.
- Pour the batter into your prepared pan and spread it evenly.
- Bake for 25-30 minutes, or until a toothpick inserted in the center comes out with a few moist crumbs (not wet batter). If you're following a specific tiramisu brownie recipe by ROSIE or another influencer, their baking times might vary slightly depending on how fudgy they prefer the base.
- Cool the brownies completely in the pan on a wire rack. This step is crucial-adding the mascarpone layer to warm brownies will cause it to melt!
Creating the Mascarpone Layer
- Beat the mascarpone cheese in a large bowl until smooth. Make sure it's at room temperature to avoid lumps.
- Add the sugar and vanilla to the mascarpone and mix until just combined.
- Dissolve the espresso powder in hot water, let it cool slightly, then stir into the mascarpone mixture.
- Whip the heavy cream in a separate bowl until stiff peaks form. This is where you'll get that light, airy texture that makes these tiramisu brownies so special.
- Fold the whipped cream gently into the mascarpone mixture until fully incorporated. Use a light hand to maintain the airiness.
- Spread the mascarpone topping evenly over the cooled brownies. If you've seen those beautiful tiramisu brownies on Instagram, you know how important this smooth, even layer is for presentation.
Finishing Touches
- Refrigerate for at least 4 hours, or preferably overnight. This resting time allows the flavors to meld and intensify, similar to how traditional tiramisu needs time to develop its full flavor profile.
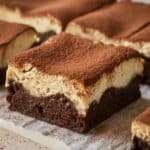
- Dust generously with cocoa powder just before serving, using a fine-mesh sieve for that even, professional-looking coating you see on Pampered Chef demonstrations.
- Cut into squares with a clean, warm knife, wiping the blade between cuts for those picture-perfect slices that would make teakandthyme proud.
- Serve chilled. These brownies actually taste better cold, with the contrast between the fudgy brownie and the light, creamy topping at its most pronounced.
Substitutions
- Can't find mascarpone? Mix 8 oz cream cheese with ¼ cup heavy cream and 2 tablespoons sour cream for a similar texture and flavor.
- Making vegan tiramisu brownies? Substitute vegan butter, flax eggs (1 tablespoon ground flaxseed + 3 tablespoons water = 1 egg), and dairy-free cream cheese with coconut cream for the topping.
- Gluten-free option: Use your favorite 1:1 gluten-free flour blend in the brownie base. The tiramisu brownie recipe works surprisingly well with this simple swap!
- No espresso powder? Instant coffee works too, just use 1.5 times the amount for similar strength. For a non-caffeinated version, decaf instant coffee gives you the flavor without the buzz.
- Pampered Chef fans: Their brownie mix makes a convenient base if you're short on time-just add the espresso powder to the mix for that signature tiramisu flavor.
Variations
Want to put your own spin on these tiramisu brownies? Here are some delicious ways to customize this recipe:
Mocha Tiramisu Brownies
Enhance the coffee flavor by adding ½ cup mini chocolate chips to the brownie batter and an extra tablespoon of espresso powder to the mascarpone layer for an intense mocha experience.
Baileys Tiramisu Brownies
Substitute the Kahlua with Baileys Irish Cream in both the brownie base and mascarpone topping for a creamy, Irish-inspired version that's perfect for St. Patrick's Day celebrations.
Nutella Tiramisu Brownies
Swirl ¼ cup of Nutella into the brownie batter before baking and add 2 tablespoons to the mascarpone mixture for a hazelnut-chocolate twist that complements the coffee flavors beautifully.
Amaretto Tiramisu Brownies
Replace the coffee liqueur with Amaretto for a subtle almond flavor that pairs wonderfully with the chocolate and mascarpone elements.
Equipment For Tiramisu Brownies
- 9×13-inch baking pan
- Parchment paper
- Medium saucepan (for melting butter) or microwave-safe bowl
- Large mixing bowls (at least 2)
- Whisk
- Rubber spatula or wooden spoon
- Electric mixer (stand or handheld)
- Wire cooling rack
- Fine-mesh sieve (for dusting cocoa powder)
- Sharp knife
- Measuring cups and spoons
Storage
These tiramisu brownies actually get better after a day in the refrigerator as the flavors meld and intensify. Here's how to keep them at their best:
Refrigerator Storage
Store your tiramisu brownies in an airtight container in the refrigerator for up to 5 days. I recommend placing pieces of parchment paper between layers if you need to stack them to prevent the cocoa powder dusting from smudging.
Freezer Storage
- Freeze the entire slab (uncut) of tiramisu brownies by wrapping tightly in plastic wrap, then aluminum foil.
- Freeze for up to 2 months.
- Individual squares can also be frozen-wrap each piece tightly in plastic wrap, then place in a freezer bag.
Top Tip
Don't rush the cooling process. Patience is key to avoiding a melted topping.
For cleaner cuts, place the brownies in the freezer for 15 minutes before slicing.
Store any leftovers in the refrigerator, covered, for up to 5 days-though finding "leftovers" of these brownies is rare!
For a more pronounced coffee flavor, similar to what you might find in vegan tiramisu brownies recipes that compensate for the dairy-free ingredients, increase the espresso powder to 3 tablespoons.
Grandmama's Magic Touch
My Italian grandmother would always say the secret to perfect tiramisu brownies isn't in the recipe-it's in the patience. "Aspetta, cara mia," she'd whisper while gently folding mascarpone by hand with her wooden spoon worn smooth from decades of use. Unlike those quick tiramisu brownie recipes you'll find on TikTok or Instagram, Nonna insisted on "riposo"-letting the brownies rest overnight in the refrigerator, covered with her special linen cloth.
This waiting period, she explained while dusting cocoa powder with practiced precision, allows the espresso to fully infuse the brownie layer, much like how traditional tiramisu from teakandthyme needs time for the ladyfingers to soak. When I was impatient (which was always), she'd slip me a tiny corner piece and wink, "The rest will taste twice as good tomorrow."
FAQ
What are tiramisu brownies?
Tiramisu brownies are a fusion dessert that combines two beloved treats: fudgy chocolate brownies and Italian tiramisu. They feature a coffee-infused brownie base topped with a creamy mascarpone layer and dusted with cocoa powder. Unlike traditional tiramisu that uses ladyfingers, these brownies replace that component with a rich chocolate brownie layer while maintaining the signature coffee and mascarpone flavors of classic tiramisu.
Is it better to use soft or hard ladyfingers for tiramisu?
Traditional tiramisu uses hard (savoiardi) ladyfingers rather than soft ones because they hold their structure better when soaked in coffee. However, tiramisu brownies eliminate this concern entirely by replacing ladyfingers with a brownie base, making them easier to prepare while still delivering those classic tiramisu flavors.
How much alcohol is in tiramisu?
Classic tiramisu typically contains a small amount of liqueur (often Marsala wine, rum, or coffee liqueur). In these tiramisu brownies, alcohol is completely optional-the recipe includes 2 tablespoons of Kahlua or coffee liqueur in the brownie base, which is minimal when distributed throughout the entire dessert. The alcohol largely cooks off during baking, leaving just the flavor. You can easily omit the alcohol entirely for a family-friendly version.
What not to do when making tiramisu?
Avoid these common mistakes for perfect tiramisu brownies:
Don't use cold mascarpone cheese-it will create lumps in your topping
Don't rush the cooling process-adding mascarpone topping to warm brownies will cause it to melt
Don't overbake the brownies-they should remain slightly fudgy
Don't skip the refrigeration time-these brownies need at least 4 hours to set properly
Don't use a metal pan without lining it-the coffee in the brownies can react with metal
Don't whip the mascarpone too vigorously-it can separate and become grainy
Tiramisu Brownies That Never Lets You Down!
There you have it-tiramisu brownies that bring together the best of Italian elegance and fudgy American indulgence! This dessert has become my go-to when I want to impress guests without spending hours in the kitchen. The combination of rich chocolate, creamy mascarpone, and coffee notes creates something truly magical that's greater than the sum of its parts.
Have you tried making tiramisu brownies before? I'd love to see your creations-tag me on social media or leave a comment below with your experience! And if you enjoyed this fusion dessert, you might also love my Sourdough Brownies, Matcha Brownies Recipe, or Cosmic Brownie Recipe for more Italian-inspired treats that are just as impressive but surprisingly simple to make.
Related
Looking for other recipes like this? Try these:


Pairing
These are my favorite dishes to serve with Tiramisu Brownies


Tiramisu Brownies
Ingredients
Equipment
Method
- Preheat oven to 350°F (175°C). Line a 9×13-inch baking pan with parchment paper.
- Melt the butter in a medium saucepan over low heat or microwave-safe bowl.
- Whisk the sugar into the melted butter until glossy.
- Whisk in eggs one at a time for a crackly brownie top.
- In a separate bowl, mix flour, cocoa powder, salt, and espresso powder.
- Gently fold dry ingredients into wet ingredients until just combined.
- Pour into prepared pan, smooth out, and bake for 25-30 minutes, or until a toothpick comes out with moist crumbs.
- Let brownies cool completely before adding mascarpone layer.
- In a large bowl, beat mascarpone until smooth.
- Mix in sugar and vanilla until combined.
- Stir in dissolved espresso powder.
- In another bowl, whip heavy cream until stiff peaks form.
- Gently fold whipped cream into mascarpone mixture.
- Evenly spread the mascarpone topping over cooled brownies.
- Refrigerate for at least 4 hours (preferably overnight) for best flavor.
- Before serving, dust generously with cocoa powder.
- Use a warm, clean knife for perfect slices. Serve chilled.


Leave a Reply