
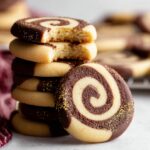
These buttery pinwheel cookies are everything a slice-and-bake cookie should be: crispy on the edges, tender in the center, with beautiful chocolate and vanilla swirls that look like you spent hours in the kitchen. I first made these with my sister Karla one December afternoon, and we couldn't stop eating them warm from the oven. The dough comes together so easily, and the best part? You can make it ahead and bake fresh cookies whenever a craving hits.

If you love simple cookies with a little visual wow factor, try pairing these with a slice of Vegan Strawberry Cake or serving them alongside Homemade Eclairs for a dessert spread that feels bakery-special.
What Makes These Pinwheel Cookies So Good
They're incredibly buttery and flavorful. The vanilla dough is soft and sweet, and the chocolate layer adds just enough richness without being overpowering. Each bite has that perfect balance.
The slice-and-bake method is genius. You make the dough, roll it up, chill it, and then slice cookies whenever you want. It's one of those easy holiday cookie recipes that actually saves you time.
They look impressive but aren't complicated. The swirl pattern makes them feel special, like something you'd buy at a fancy bakery. But the process is straightforward, and even imperfect swirls still look beautiful.
You can customize them. Dip them in melted chocolate, add sprinkles, or leave them plain. They're delicious no matter what.
They stay fresh for days. These Pinwheel Cookies hold up beautifully in an airtight container, which makes them perfect for gifting or making ahead for the holidays.
Jump to:
Pinwheel Cookies Ingredients
Here's everything to make these beautiful Pinwheel Cookies from scratch.
See Recipe Card Below This Post For Ingredient Quantities
Base Cookie Dough:
- All-purpose flour: Forms the structure and keeps the cookies tender. Spoon and level your flour for the best texture.
- Baking powder: Gives the cookies a slight lift and helps them spread just enough.
- Salt: Balances the sweetness and brings out the vanilla flavor.
- Unsalted butter: Adds richness and that melt-in-your-mouth texture. Make sure it's softened to room temperature so it creams properly.
- Granulated sugar: Sweetens the dough and helps create those crispy edges.
- Egg and egg yolk: Bind everything together and add moisture. The extra yolk makes the dough extra tender.
- Pure vanilla extract: Gives the vanilla dough that classic, warm flavor.
For the Chocolate Dough:
- Unsweetened cocoa powder: Creates the chocolate layer. Natural or dutch-process both work beautifully.
- Milk: Helps the cocoa blend smoothly into the dough.
- Espresso powder (optional): Deepens the chocolate flavor without making the cookies taste like coffee.
Optional for Dipping:
- Chocolate: White, semi-sweet, or dark chocolate all work. Finely chop it so it melts evenly.
- Sprinkles: Add a festive touch if you're making these for the holidays or a celebration.
How to Make Pinwheel Cookies
A quick overview before you start: you'll mix the dough, divide it, flavor half with chocolate, roll both into flat sheets, stack them, roll into a log, chill, slice, and bake.
Make the dough: Whisk the flour, baking powder, and salt together in a medium bowl. In a large bowl, use your electric mixer to cream the softened butter and sugar on medium-high speed for about 3 minutes until it looks light and fluffy. Add the egg, egg yolk, and vanilla, then beat for 1 minute until everything is smooth and combined. Gradually mix in the dry ingredients until the dough comes together. It should be thick and a little sticky.

Divide the dough: Split the dough into two equal portions, around 800 to 900 grams each. One half stays vanilla, and the other becomes chocolate.
Make the chocolate dough: Take one portion and mix in the cocoa powder, milk, and espresso powder if you're using it. Beat until the color is even and the cocoa is fully blended.
Chill the dough: Shape both portions into rectangles about 1 inch thick and roughly 4 by 5 inches. Wrap each one in plastic wrap or parchment paper and refrigerate for 60 to 90 minutes. This makes the dough easier to roll out.
Roll out the doughs: Lightly flour a sheet of parchment paper and roll the vanilla dough into an 8 by 14 inch rectangle. Do the same with the chocolate dough on a separate piece of parchment. Carefully place the chocolate dough on top of the vanilla dough, lining them up as evenly as you can.
Roll into a log: Starting from one of the long sides, roll the stacked doughs tightly into a log. The parchment paper helps you get a tight roll without the dough sticking to your hands. Once it's rolled, cut the log in half so you have two 7-inch logs.
Chill again: Wrap each log in plastic wrap and refrigerate for at least 2 hours. You can leave them in the fridge for up to 4 days, which is perfect if you want to bake fresh cookies over a few days.
Preheat and slice: Preheat your oven to 350°F (177°C). Slice each log into 14 cookies, about ½ inch thick. Place them 2 inches apart on a parchment-lined baking sheet so they have room to spread.
Bake: Bake for 14 to 15 minutes, just until the edges turn lightly golden. The centers might look a little soft, and that's exactly what you want. Let them cool on the baking sheet for 5 minutes, then move them to a wire rack to cool completely.

Optional chocolate dipping: If you want to dip them, melt your chocolate in a double boiler or in the microwave in short bursts. Dip each cooled cookie halfway, add sprinkles if you like, and let the chocolate set on a sheet of parchment paper.
Substitutions and Variations
Different extracts: Swap the vanilla for almond extract for a subtle nutty flavor, or try peppermint extract during the holidays.
Add-ins: Fold mini chocolate chips, chopped nuts, or toffee bits into the vanilla dough before rolling for extra texture.
Reverse the swirl: Make the chocolate dough the outside layer and the vanilla dough the inside for a different look.
Colored dough: Add a tiny bit of gel food coloring to the vanilla dough for festive Pinwheel Cookies Christmas colors like red, green, or pink.
Citrus twist: Add a teaspoon of lemon or orange zest to the vanilla dough for a bright, fresh flavor.
Equipment For Pinwheel Cookies
- Glass mixing bowl: For mixing your dry ingredients.
- Whisk: To combine the flour, baking powder, and salt evenly.
- Electric mixer: A handheld or stand mixer makes creaming the butter and sugar so much easier.
- Baking sheets: You'll need at least two for baking in batches.
- Silicone baking mats or parchment paper: Keeps the cookies from sticking and makes cleanup simple.
- Rolling pin: Essential for rolling out the dough into even rectangles.
- Cooling rack: Lets air circulate around the Pinwheel Cookies so they cool evenly.
- Double boiler (optional): Makes melting chocolate foolproof if you're dipping the cookies.
How to Store Pinwheel Cookies
At room temperature: Store baked Pinwheel Cookies in an airtight container for up to 1 week. They'll stay crispy on the edges and tender in the center.
In the fridge: If you've dipped them in chocolate and it's warm in your kitchen, keep them in the fridge so the chocolate stays firm.
In the freezer: These freeze beautifully. Layer them between sheets of parchment paper in a freezer-safe container and freeze for up to 3 months. Thaw at room temperature for about 20 minutes before serving.
Freezing the dough: You can freeze the unbaked dough logs for up to 3 months. Wrap them tightly in plastic wrap, then in foil. Slice and bake straight from the freezer, adding a minute or two to the baking time.
Serving Suggestions
With coffee or tea: These Pinwheel Cookies are perfect for dunking. The buttery dough softens just a little in hot coffee, and the chocolate flavor gets even richer.
As part of a cookie platter: Pair them with Coconut Biscuits and Honey Carrot Pie for a dessert spread with different textures and flavors.
With ice cream: Crumble a couple of Pinwheel Cookies over vanilla ice cream for an easy, elegant dessert.
Gift them: Stack them in a tin or clear bag tied with ribbon. They look so pretty with those swirls showing, and they travel well.
Expert Tips For Pinwheel Cookies
Chill the dough long enough. If the dough is too soft when you try to roll it, it'll stick and tear. Be patient with the chilling time.
Use parchment paper to roll. It keeps the dough from sticking and makes it easy to lift and stack the layers.
Roll tightly. The tighter your log, the more defined your swirls will be. Don't worry if it's not perfect they'll still taste amazing.
Slice with a sharp knife. A clean, sharp knife gives you neat slices without squishing the dough. Wipe the blade between cuts if the dough starts sticking.
Watch the baking time. These Pinwheel Cookies can go from perfectly golden to overbaked quickly. Start checking at 13 minutes.
Let them cool completely before dipping. If the Pinwheel Cookies are even a little warm, the chocolate won't set properly.
FAQ
Can pinwheels be made the night before?
Yes! You can make the dough logs and keep them in the fridge for up to 4 days before slicing and baking. You can also freeze the logs for up to 3 months. Karla always makes a double batch and keeps extra logs in the freezer so she can bake fresh cookies whenever she wants.
What fillings work best in pinwheels?
The classic chocolate and vanilla combo is hard to beat, but you can get creative. Try adding a thin layer of jam, Nutella, or peanut butter between the dough layers before rolling. Just don't add too much, or the cookies can get soggy.
Which cookies are the easiest to make?
Slice-and-bake cookies like these pinwheel cookies are some of the easiest because you can make the dough ahead and bake just a few at a time. There's no rolling out individual cookies or using cookie cutters, which saves so much time.
How to cut pinwheels so they don't fall apart?
Make sure the dough is well-chilled before slicing. Use a sharp knife and press straight down instead of sawing back and forth. If the dough starts to soften while you're slicing, pop it back in the fridge for 10 minutes. A little chill time goes a long way.
Related
Looking for other recipes like this? Try these:


Pairing
These are my favorite dishes to serve with Pinwheel Cookies


Pinwheel Cookies
Ingredients
Method
- Whisk the flour, baking powder, and salt together in a medium bowl. Set aside.
- In a large bowl, beat the butter and sugar together with an electric mixer on medium-high speed for about 3 minutes until creamy. Add the egg, egg yolk, and vanilla, and beat on high speed for about 1 minute until fully incorporated. Scrape the sides of the bowl as needed.
- Gradually add the dry ingredients to the wet ingredients and mix on low speed until just combined. The dough will be thick and slightly sticky.
- Divide the dough into two portions, one slightly larger for the chocolate dough. Shape each into a block.
- To make the chocolate dough, place one portion of the dough back into the bowl. Add cocoa powder, milk, and espresso powder (if using) and mix on low speed until combined.
- Wrap both dough blocks in plastic wrap and refrigerate for 60-90 minutes, or until firm but still pliable.
- After chilling, roll out the vanilla dough into an 8×14-inch rectangle on parchment paper. Repeat with the chocolate dough on a separate sheet of parchment paper.
- Place the chocolate dough on top of the vanilla dough. Carefully flatten and smooth it down to remove air bubbles, and trim any uneven edges.
- Starting from the long side, tightly roll the two doughs together, ensuring there are no gaps. Divide the roll into two 7-inch logs.
- Wrap the dough logs in plastic wrap or parchment paper and refrigerate for 2 more hours.
- Preheat the oven to 350°F (177°C). Line two baking sheets with parchment paper.
- Slice each dough log into 14 half-inch thick cookies. Place cookies on the baking sheets about 2 inches apart. Bake for 14-15 minutes until lightly golden on the edges.
- Allow the cookies to cool on the baking sheets for 5 minutes before transferring to a wire rack to cool completely.
- Optional: Melt chocolate in a double boiler or microwave, and dip half of each cookie in the melted chocolate. Decorate with sprinkles, if desired. Let the chocolate set at room temperature or refrigerate to speed up the process.


Leave a Reply