
The first time I pulled these out of the oven, Liam pressed his nose right up to the cooling rack. "They look like space," he said, poking one gently with his finger. He wasn't wrong. They were so dark they were almost reflective, with this soft shine across the tops that caught the kitchen light.
Here's the thing about black velvet cupcakes: they taste like a secret. Soft, rich, with this melt-on-your-tongue texture that makes you close your eyes for a second. No food coloring, no weird aftertaste. Just deep chocolate and that signature velvet crumb that red velvet fans already know and love.

The Day Liam Declared These "Better Than Store Cupcakes"
So here's what happened. I mixed up the batter on a Saturday morning, and Liam was hovering like a little kitchen inspector. He kept asking if he could lick the whisk (no, buddy, raw eggs), and then he asked why the batter was so thin.
"It's supposed to be that way," I told him, pouring the hot coffee into the bowl. The batter turned glossy and smooth, almost like a milkshake. He looked skeptical.
Twenty minutes later, the kitchen smelled like warm chocolate and butter. I pulled the Black Velvet Cupcakes out, and they had these perfect domed tops. Liam poked one gently. "They're so soft!" he said, genuinely amazed.
When I frosted them later that afternoon, he tried one before I could even finish piping the rest. His eyes went wide. "Mom, these are better than the ones from the store."
I saved that moment in my heart. It's not every day your kid chooses your baking over a bakery.
Jump to:
- The Day Liam Declared These "Better Than Store Cupcakes"
- Black Velvet Cupcakes Ingredients
- How to Make Black Velvet Cupcakes
- Smart Substitutions and Swaps
- Serving Suggestions
- Equipment For Black Velvet Cupcakes
- Storage and Make-Ahead Tips
- Top Tip
- Why You'll Love This Black Velvet Cupcakes Recipe
- FAQ
- You've Got This
- Related
- Pairing
- Black Velvet Cupcakes
Black Velvet Cupcakes Ingredients
See Recipe Card Below This Post For ingtedient Quantites
For the Cupcakes:
- All-purpose flour (spooned and leveled)
- Black cocoa powder (this is key for the color)
- Baking powder
- Baking soda
- Salt
- Granulated sugar
- Buttermilk, at room temperature
- Vegetable oil
- Large egg, at room temperature
- Pure vanilla extract
- Distilled white vinegar
- Hot coffee (decaf works too) or hot water
For the Frosting:
- Butter, softened
- Confectioners' sugar
- Black cocoa powder
- Heavy cream or milk, at room temperature
- Pure vanilla extract
- Salt
How to Make Black Velvet Cupcakes
This is one of those Black Velvet Cupcakes where the steps are simple, but the results look impressive. Let's walk through it.
Make the Cupcakes:
Start by preheating your oven to 350°F (177°C). Line a 12-cup muffin pan with cupcake liners, and grab a second pan or a few extra liners since this recipe makes 14 to 15 cupcakes. I usually just bake in two rounds.
In a medium bowl, whisk together the flour, black cocoa powder, baking powder, baking soda, and salt. Set that aside. In a larger bowl (one with a pour spout makes life easier), whisk together the sugar, buttermilk, oil, egg, vanilla, and vinegar until everything's smooth and combined.

Now here's where it gets fun. Add the dry ingredients to the wet mixture, then pour in the hot coffee. Whisk it all together until the batter is completely smooth. It'll be thin, almost pourable, and that's exactly what you want. The baking soda and vinegar reaction plus the coffee creates that perfect soft velvet crumb.
Fill your cupcake liners about two-thirds to three-quarters full. I use an ice cream scoop for this because it's faster and way less messy. Bake for 20 to 22 minutes, or until a toothpick comes out clean and the tops spring back when you press them gently.
Let them cool in the pan for about 15 minutes, then transfer them to a cooling rack. Don't frost them until they're completely cool, or the frosting will just slide right off.

Make the Frosting:
Using a handheld or stand mixer fitted with a paddle attachment, beat the butter on medium speed for about two minutes, until it's creamy and smooth. Add the confectioners' sugar, cocoa powder, ¼ cup of cream, vanilla, and salt. Beat on low for about 30 seconds, then crank it up to high for one minute.
If the frosting feels too thick, add another tablespoon of cream and beat again. You want it smooth and pipeable, but still thick enough to hold a swirl.
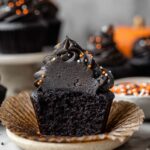
Frost your cooled cupcakes using an icing knife or a piping bag with an Ateco 826 or Wilton 1M tip. I like a big, dramatic swirl on top. Add sprinkles if you're feeling festive.
These visually striking cupcakes store beautifully at room temperature for up to two days, or in the fridge for up to four days.
For more easy dessert ideas, check out this Easy Bee Sting Cake Recipe.
Smart Substitutions and Swaps
Want to tweak this Black Velvet Cupcakes a little? Here are some options that won't mess with the texture or flavor.
Cream Cheese Frosting: If you prefer tangy over sweet, swap the buttercream for a black velvet cupcakes with cream cheese frosting version. Just beat 8 ounces of softened cream cheese with ½ cup of butter, 3 cups of powdered sugar, and ¼ cup of black cocoa. It's rich, tangy, and absolutely delicious.
Oil-Free Version: You can use melted butter instead of vegetable oil if you prefer. It'll give the cupcakes a slightly richer flavor, though the oil does make them a bit more tender.
Coffee Substitute: Not a coffee person? Use hot water instead. The cupcakes will still be delicious, just slightly less intense in chocolate flavor. The coffee is there to enhance cupcake moisture and deepen the cocoa taste, but it's not essential.
Dairy-Free Option: Swap the buttermilk for a plant-based milk mixed with a little vinegar, and use coconut cream in the frosting. Use vegan butter, and you've got a dairy-free black cocoa cupcakes recipe that still tastes incredible.
Serving Suggestions
These Black Velvet Cupcakes dessert are stunning on their own, but here are a few ways to make them even more special.
Serve them on a dark slate or black plate for a dramatic presentation. The contrast makes them look like something out of a fancy bakery. Add a drizzle of raspberry sauce or a dollop of whipped cream on the side for a pop of color.
They pair beautifully with a cold glass of milk or a rich cup of coffee. For a party, set them out on a tiered stand with some fresh berries scattered around the base. It's simple, but it looks gorgeous.
If you're making these for Halloween cupcakes or a spooky-themed event, top them with little candy eyeballs, edible spiders, or silver star sprinkles. Kids go wild for that kind of thing.
Equipment For Black Velvet Cupcakes
- 12-cup muffin pan (plus a second pan or extra liners)
- Cupcake liners
- Mixing bowls
- Whisk
- Electric mixer (handheld or stand mixer with paddle attachment)
- Cooling rack
- Piping bag and piping tip (I love the Ateco 826 for big swirls)
- Cupcake carrier (if you're taking these to a party)
Storage and Make-Ahead Tips
These Black Velvet Cupcakes keep really well, which makes them perfect for party cupcakes ideas or baking ahead for a celebration.
Room Temperature: Store frosted cupcakes in an airtight container at room temperature for up to two days. They'll stay soft and fresh without drying out.
Refrigerated: If you need them to last longer, pop them in the fridge for up to four days. Just bring them to room temperature before serving so the frosting softens up a bit.
Freezing: You can freeze the unfrosted cupcakes for up to three months. Wrap them individually in plastic wrap, then store them in a freezer bag. Thaw them on the counter and frost when you're ready to serve.
Frosting Ahead: The frosting can be made a day or two in advance and kept in the fridge. Just let it come to room temperature and give it a quick whip with the mixer before using.
Top Tip
Here's something I learned the hard way: don't skip the room temperature ingredients. I know it's tempting to just pull everything out of the fridge and start mixing, but cold buttermilk and cold eggs don't blend as smoothly. The batter can get lumpy, and the texture won't be as soft.
If you forget to take your eggs out ahead of time, just place them in a bowl of warm water for about five minutes. For the buttermilk, a quick zap in the microwave (like 10 seconds) does the trick. It's a small step, but it makes a real difference in enhancing Black Velvet Cupcakes moisture and getting that perfect crumb.
Liam loves to help measure the cocoa powder. He calls it his "messy job" because it always poofs up a little when we dump it into the bowl. We've learned to do it over the sink now.
Why You'll Love This Black Velvet Cupcakes Recipe
Let me tell you why these have become a go-to in our house. First, they're moist black velvet cupcakes that stay tender for days. No dry, crumbly disappointments here. The black cocoa powder gives them that signature dark color without any artificial dyes, which means no stained fingers or weird chemical taste.
They're also surprisingly easy. You don't need fancy equipment or hours of prep time. Just two bowls, a whisk, and a mixer for the frosting. The batter comes together in about ten minutes, and the cupcake baking temperature of 350°F is as standard as it gets.
And let's talk about versatility. These Black Velvet Cupcakes work for so many occasions. Halloween? Absolutely. A moody winter birthday? Perfect. A gothic theme dessert table? They'll steal the show. You can even add a little raspberry filling or swap the black velvet frosting for cream cheese if you want to mix things up.
They're the kind of bakery-style black cupcakes that make people ask for the recipe. And now you have it.
If you're in the mood for more cozy chocolate treats, you might also love this Easy Chocolate Peppermint Cookies Recipe or these Best Butterfinger Balls.

FAQ
How long do black velvet cupcakes last?
These Black Velvet Cupcakes stay fresh at room temperature for up to two days, or in the fridge for up to four days. Just store them in an airtight container to keep them from drying out. If you freeze the unfrosted cupcakes, they'll last up to three months. Pro tip: bring refrigerated cupcakes to room temperature before serving so the frosting softens up.
What are 5 fun facts about cupcakes?
Oh, I love this question! One, the first Black Velvet Cupcakes appeared in 1796. Two, they were originally called "number cakes" because the measurements were easy to remember. Three, cupcakes got their name because they were baked in cups. Four, the world's largest cupcake weighed over 1,200 pounds. And five, cupcakes became wildly popular again in the early 2000s thanks to TV shows and bakeries. Liam's fun fact? "They make you smile."
What is the secret ingredient in black velvet cake?
The secret is the combination of buttermilk and vinegar. Together, they react with the baking soda to create a super soft, tender crumb. The hot coffee is another secret weapon, it deepens the chocolate flavor without making the Black Velvet Cupcakes taste like coffee at all. And of course, black cocoa powder gives you that dramatic dark color naturally, no food coloring needed.
Do you have to refrigerate black bottom cupcakes?
Black Velvet Cupcakes with buttercream frosting can stay at room temperature for up to two days as long as they're in an airtight container. If you're using cream cheese frosting or if it's really hot in your kitchen, go ahead and refrigerate them. They'll stay good for up to four days in the fridge. Just let them sit out for a bit before serving.
You've Got This
There's something really satisfying about making a batch of Black Velvet Cupcakes from scratch. They look fancy, they taste incredible, and they're honestly easier than you'd think. The rich chocolaty flavor and that soft velvet crumb make them feel like a special occasion, even if you're just baking them on a quiet weekend afternoon.
Liam's already asked when we can make them again. I think that says it all.
So grab your black cocoa powder, preheat that oven, and get ready to bake something beautiful. Your kitchen's about to smell amazing.
Related
Looking for other recipes like this? Try these:


Pairing
These are my favorite dishes to serve with Black Velvet Cupcakes


Black Velvet Cupcakes
Ingredients
Equipment
Method
- Preheat the oven to 350°F (177°C) and line a muffin tin with cupcake papers, adding extra liners to a second pan if needed.
- Whisk the flour, cocoa, baking powder, baking soda, and salt in a medium bowl until evenly blended.
- Combine the sugar, buttermilk, oil, egg, vanilla, and vinegar in a large bowl and whisk until smooth.
- Add the dry mixture to the wet ingredients, pour in the hot coffee, and whisk until the batter becomes thin and fully combined.
- Divide the batter into liners, filling each about two-thirds to three-quarters full.
- Bake for 20-22 minutes, checking that a toothpick comes out clean or that the tops spring back when lightly pressed.
- Let the cupcakes cool in the pan briefly, then move them to a rack to cool completely.
- Beat the butter with a mixer until creamy, then add the sugar, cocoa, cream, vanilla, and salt, mixing first on low and then whipping until fluffy; adjust cream as needed.
- Frost the cooled cupcakes and decorate as desired.


Leave a Reply