
These creamy, caramel-spiced No-Bake Biscoff Cheesecake Cups layer silky cheesecake filling with those buttery, cinnamon-kissed cookies you can't stop eating. I first tried Biscoff spread on a flight to visit my sister Karla, and I've been sneaking spoonfuls ever since. These little cups come together in just 22 minutes of hands-on time, no oven needed, which makes them perfect for hot summer days or when you need a show-stopping dessert without the stress.

If you love easy, no-fuss treats like this, you'll also want to try my Sugar Cookie Cheesecake or this 3-Ingredient Chocolate Brownie Pie That's Dangerously Easy! The cookie butter topping gets glossy and gorgeous, and that first creamy, crunchy bite tastes like heaven.
What Makes No-Bake Biscoff Cheesecake Cups Dessert So Special
There's something about the way No-Bake Biscoff Cheesecake Cups taste, slightly spiced and deeply caramelized, that makes everything better. This recipe skips the oven entirely, so you won't heat up your kitchen. The cream cheese filling whips up thick and luscious, and the Biscoff spread swirls right in for that signature cookie butter flavor. You get layers of texture in every spoonful: crunchy crumbs, smooth cheesecake, and a drizzle of melted Biscoff on top.
I made these for Karla's birthday party last summer, and she took one bite and said, "Oh my gosh, Em, these taste like the inside of a fancy bakery case!" Then she ate three more. Even my neighbor Sofia, who usually sticks to fruit for dessert, grabbed seconds. They're rich but not heavy, sweet but not cloying, and they look absolutely gorgeous lined up on a tray.
Jump to:
- What Makes No-Bake Biscoff Cheesecake Cups Dessert So Special
- No-Bake Biscoff Cheesecake Cups Ingredientst
- How to Make No-Bake Biscoff Cheesecake Cups
- How to Store Your No-Bake Biscoff Cheesecake Cups
- Substitutions and Variations
- Equipment For No-Bake Biscoff Cheesecake Cups
- Serving Suggestions
- Expert Tips
- FAQ
- Related
- Pairing
- No-Bake Biscoff Cheesecake Cups
No-Bake Biscoff Cheesecake Cups Ingredientst
Here's what goes into these luscious little No-Bake Biscoff Cheesecake Cups.
See Recipe Card Below This Post For ingtedient Quantites
Crumb Base:
- Lotus Biscoff biscuits (30 cookies): These form the crunchy, caramelized base. Their slightly spiced flavor is the star here.
- Unsalted butter (2 tablespoons, melted): Binds the crumbs together so they press into a firm layer.
Cheesecake Filling:
- Heavy cream (16 oz or 2 cups): Whips up thick and airy, giving the filling its light, mousse-like texture.
- Cream cheese (8 oz, at room temperature): Provides that classic tangy cheesecake flavor and creamy body. Make sure it's softened so it blends smoothly.
- Powdered sugar (½ cup): Sweetens the filling without adding grittiness.
- Biscoff spread (½ cup): This is the magic ingredient. It adds cookie butter flavor and a hint of warm spice.
- Vanilla extract (1 teaspoon): Rounds out the flavors and adds a little extra warmth.
Garnish:
- Biscoff spread: Melted and drizzled on top for a glossy, bakery-style finish.
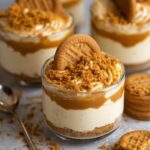
- Biscoff cookies (8 cookies, cut in half): The pretty topping that tells everyone exactly what flavor they're about to enjoy.
How to Make No-Bake Biscoff Cheesecake Cups
Follow these simple steps to make your No-Bake Biscoff Cheesecake Cups from start to finish.
Make the base: Crush 30 Biscoff biscuits into fine crumbs using a food processor or a rolling pin and a zip-top bag. In a medium bowl, mix the crumbs with 2 tablespoons of melted butter until the mixture feels like wet sand. Set aside a few tablespoons of crumbs for decorating later. Divide the rest evenly into your dessert cups, about 2 to 3 tablespoons per cup, and press down firmly to create an even layer.

Whip the cream: In a large bowl, whisk the heavy cream until stiff peaks form. This usually takes about 3 to 4 minutes with an electric mixer on medium-high speed. You'll know it's ready when the cream holds its shape and doesn't slide off the whisk.
Make the cheesecake mixture: In a separate bowl, whisk together the softened cream cheese, powdered sugar, ½ cup of Biscoff spread, and vanilla extract until the mixture is smooth and creamy with no lumps. This takes about 2 minutes of good whisking.

Fold it together: Gently fold the whipped cream into the cream cheese mixture in three additions. Use a spatula and fold from the bottom up, turning the bowl as you go. Stop as soon as everything is combined and you don't see any white streaks.

Pipe the filling: Transfer the cheesecake mixture into a piping bag (or a zip-top bag with the corner snipped off) and pipe it into each cup, filling them almost to the top. This keeps things neat and gives you those pretty swirls.
Add the topping: Melt the remaining ½ cup of Biscoff spread in the microwave for about 20 seconds, stirring until it's smooth and pourable. Spoon or drizzle a thin layer over each cup. The spread will settle into a glossy, gorgeous topping.

Decorate: Press a Biscoff cookie half into the top of each cup and sprinkle with the reserved cookie crumbs for extra texture and visual appeal.

Chill: Refrigerate the cups for at least 4 hours, or until the filling is firm and set. They'll slice cleanly and taste even better after a full chill.
How to Store Your No-Bake Biscoff Cheesecake Cups
These No-Bake Biscoff Cheesecake Cups keep beautifully in the fridge. Cover them loosely with plastic wrap or store them in an airtight container for up to 4 days. The flavors actually deepen after a day or two, so they're great for making ahead.
If you want to freeze them, skip the melted Biscoff topping and cookie garnish. Wrap each cup tightly in plastic wrap, then place them in a freezer-safe container. They'll keep for up to 2 months. Thaw in the fridge overnight, then add the topping and cookies right before serving.
Substitutions and Variations
Don't have Biscoff cookies? You can use graham crackers or digestive biscuits for the crust. The flavor will be milder, but still delicious.
Want a lighter version? Swap half the heavy cream for whipped Greek yogurt. It adds tang and cuts down on richness without losing the creamy texture.
No piping bag? Just spoon the filling into the cups. It won't look quite as fancy, but it'll taste exactly the same.
Add chocolate. Fold in ½ cup of mini chocolate chips or drizzle melted dark chocolate over the top along with the Biscoff spread.
Make it boozy. Add 1 tablespoon of coffee liqueur or Irish cream to the cream cheese mixture for a grown-up twist.
Equipment For No-Bake Biscoff Cheesecake Cups
Here's what makes this No-Bake Biscoff Cheesecake Cups come together smoothly:
- Food processor or rolling pin: For crushing the cookies into fine crumbs.
- Whisk or electric mixer: To whip the cream and blend the filling.
- Piping bag: Makes filling the cups neat and pretty. A zip-top bag works too.
- Dessert cups: I use clear plastic or glass cups so you can see the layers. You'll need 8 standard-size cups or up to 24 mini ones.
- Microwave-safe bowl: For melting the Biscoff spread topping.
Serving Suggestions
These No-Bake Biscoff Cheesecake Cups are rich and satisfying on their own, but here are a few ways to serve them:
With fresh coffee. The caramelized flavor of Biscoff pairs beautifully with a hot cup of coffee or a latte.
Alongside fresh berries. Strawberries or raspberries add a tart, juicy contrast to the sweet, creamy filling.
On a dessert board. Line them up with other small treats like my Best Cherry Snowball Cookies Ready in 15 minutes! or Easy Strawberry Danish Recipe for a stunning spread.
With a dollop of whipped cream. A little extra cream on top makes them feel even more indulgent, though they definitely don't need it.
Expert Tips
Room temperature cream cheese is a must. Cold cream cheese will leave you with lumps. Let it sit on the counter for about 30 minutes before you start.
Don't overwhip the cream. Stop as soon as you see stiff peaks. If you go too far, the cream turns grainy and buttery.
Press the crust firmly. A compact base holds up better and won't crumble when you dig in with a spoon.
Chill for the full 4 hours. I know it's tempting to sneak one early, but the filling needs time to firm up. If you're in a rush, pop them in the freezer for 90 minutes instead.
Use clear cups. They show off the gorgeous layers and make the dessert look more impressive.
FAQ
How long does a Biscoff cheesecake take to set?
These No-Bake Biscoff Cheesecake Cups need at least 4 hours in the fridge to firm up properly. If you're making them in advance, overnight is even better. The filling sets completely and the flavors meld together beautifully.
How long to let a no bake cheesecake set?
Most No-Bake Biscoff Cheesecake Cups need 4 to 6 hours to set fully. The whipped cream and cream cheese need time to stabilize and firm up in the cold. If you're short on time, 3 hours will work in a pinch, but the texture won't be quite as firm.
What are common no bake cheesecake mistakes?
The biggest mistake is using cold cream cheese, which creates lumps. Another common issue is underwhipping the cream, your filling won't be thick enough. Also, don't skip the chilling time. If you serve these too early, the filling will be soft and won't hold its shape.
Does no bake cheesecake need to be refrigerated after baking?
Yes, always keep no-bake cheesecake in the fridge. Since there's no baking to stabilize the ingredients, the cold temperature is what keeps the filling firm and safe to eat. These No-Bake Biscoff Cheesecake Cups should stay refrigerated until you're ready to serve them.
Related
Looking for other recipes like this? Try these:


Pairing
These are my favorite dishes to serve with No-Bake Biscoff Cheesecake Cups


No-Bake Biscoff Cheesecake Cups
Ingredients
Equipment
Method
- Start by crushing the Biscoff biscuits into fine crumbs, using either a food processor or rolling pin.
- In a medium bowl, combine the crushed Biscoff crumbs with the melted butter. Set aside a few tablespoons of this mixture for decoration.
- Divide the crumb mixture between the dessert cups, adding about 2-3 tablespoons to each. Press down firmly to form an even base. Set aside.
- In a large bowl, whisk the heavy cream until stiff peaks form.
- In another bowl, whisk together the cream cheese, powdered sugar, Biscoff spread, and vanilla until smooth and creamy.
- Gradually fold the whipped cream into the cream cheese mixture until fully combined.
- Transfer the cheesecake mixture into a large piping bag. Pipe the mixture evenly into each dessert cup.
- Melt ½ cup of Biscoff spread in the microwave for 20 seconds or until liquid. Drizzle a thin layer of the melted spread over the cheesecake in each cup.
- Top each cup with a halved Biscoff cookie and sprinkle with reserved cookie crumbs for decoration.
- Refrigerate the cups for at least 4 hours until the cheesecake firms up. Serve chilled.


