
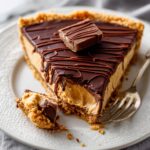
This Peanut Butter Cup Tart delivers layers of creamy peanut butter filling, rich chocolate ganache, and a buttery graham cracker crust that tastes like your favorite candy bar grew up and became dessert. It's surprisingly simple to put together, and the hardest part is waiting for it to chill.I first made this tart for Jackeline's birthday dinner last spring, and when I sliced into it, the glossy chocolate layer cracked just right. She took one bite and closed her eyes for a second. "This tastes like the peanut butter cups I used to sneak from my dad's Halloween stash," she said, laughing.

If you're looking for a no-bake dessert that feels fancy but comes together easily, this one's it. It reminds me a bit of the cozy flavors in my Pumpkin Hand Pies Recipe, though with that irresistible chocolate and peanut butter combo. For more indulgent treats, you might also love these Delicious Cookies and Cream Cupcakes or the nostalgic sweetness of Easy Marshmallow Hot Cocoa Cookies.
Why You'll Love This Peanut Butter Cup Tart
This Peanut Butter Cup Tart checks all the boxes. It's rich but not too heavy, sweet but balanced with a little salt, and the textures, crunchy crust, silky filling, smooth chocolate, make every bite feel layered and interesting. You don't need any special equipment beyond a mixer and a tart pan, and the ingredient list is short and straightforward.
It's also a great make-ahead option. You can prep it a day or two before you need it, and it actually slices better after a longer chill. If you're hosting or bringing something to a gathering, this Peanut Butter Cup Tart travels well and always gets compliments. The peanut butter chocolate tart combination is a crowd-pleaser, and it feels a little more sophisticated than cookies or brownies.
Jump to:
Peanut Butter Cup Tart Ingredients
These everyday ingredients come together to create a Peanut Butter Cup Tart that tastes like a bakery special.
See Recipe Card Below This Post For Ingredient Quantities
Graham Cracker Crust:
- Graham cracker crumbs: Forms the base of the crust and adds a subtle sweetness with a hint of honey flavor. You'll need about 10 to 11 full sheet graham crackers to get the right amount.
- Unsalted butter, melted: Binds the crumbs together and adds richness. Melted butter helps the crust hold its shape after baking.
- Granulated sugar: Sweetens the crust just enough to balance the peanut butter and chocolate layers.
Filling:
- Unsalted butter, softened to room temperature: Creates a smooth, creamy base for the filling. Room-temperature butter whips up lighter and blends more evenly.
- Confectioners' sugar: Sweetens the filling and gives it a silky texture that's easy to spread.
- Pure vanilla extract: Adds warmth and depth to the peanut butter flavor.
- Salt: Balances the sweetness and brings out the peanut butter's natural richness.
- Creamy peanut butter: The star of the filling. Use a standard creamy peanut butter like Jif or Skippy for the best texture. Natural peanut butter can make the filling too oily.
Topping:
- Semi-sweet, bittersweet, or milk chocolate: Melts into a glossy ganache-style topping. Choose based on how sweet you like your chocolate. Semi-sweet or bittersweet balances the sweetness of the filling nicely.
- Creamy peanut butter: Blended into the chocolate to keep the peanut butter flavor present in every layer and to help the topping set smoothly.
How to Make Peanut Butter Cup Tart
These steps guide you through making a bakery-style Peanut Butter Cup Tart that's surprisingly easy to pull off.
Preheat the oven: Preheat your oven to 350°F (177°C) so it's ready when you finish pressing the crust into the pan.
Make the crust: Stir together the graham cracker crumbs, melted butter, and sugar in a bowl until the mixture looks like wet sand. Pour it into a 9-inch tart pan and pack it in firmly. Use the bottom of a flat-bottomed measuring cup to press the crust evenly across the bottom and up the sides. Bake for 13 to 15 minutes, or until the edges turn lightly golden. Remove from the oven and let it cool for 15 minutes. It's best if the crust is still slightly warm when you add the filling.

Make the filling: Using a hand or stand mixer, beat the softened butter on medium-high speed for about 2 minutes until it looks smooth and creamy. Add the confectioners' sugar, vanilla extract, and salt, and beat until everything combines, about 1 minute. Scrape down the sides and bottom of the bowl as needed. Add the peanut butter and continue beating until the filling is smooth and fluffy.

Spread the filling: Spread the peanut butter filling evenly into the tart crust using a spatula or the back of a spoon. Set it aside while you prepare the topping.
Make the topping: In a double boiler or microwave-safe bowl, melt the chocolate and peanut butter together until smooth. If you're using the microwave, heat in short bursts and stir every 15 seconds to avoid burning. Pour the melted chocolate over the peanut butter filling and spread it evenly to the edges. If you want a decorative drizzle, reserve 1 to 2 tablespoons of the topping before pouring.
Chill: Place the tart uncovered in the refrigerator and chill for 4 to 6 hours, or up to 2 days. If you're chilling it longer than 6 hours, cover it loosely with plastic wrap. For the cleanest slices, let it chill for at least 6 hours so the layers firm up completely.
Serve: Slice the tart with a sharp knife, wiping the blade clean between cuts for neat edges. Enjoy cold straight from the fridge. Store leftovers tightly covered in the refrigerator for up to 1 week.
Substitutions and Variations
Crust options: Swap the graham cracker crust for crushed Oreos, vanilla wafers, or even pretzels for a salty twist. Just keep the butter and sugar measurements the same.
Peanut butter alternatives: If you need a nut-free version, try sunflower seed butter or cookie butter. The texture will be similar, though the flavor will change.
Chocolate choices: Use dark chocolate for a more intense, less sweet topping, or milk chocolate if you prefer something milder and creamier.
Mini tarts: Press the crust into a muffin tin lined with paper cups to make individual Peanut Butter Cup Tart. Adjust the baking time to about 8 to 10 minutes.
Add-ins: Fold mini chocolate chips or chopped peanut butter cups into the filling for extra texture, or sprinkle sea salt flakes over the chocolate topping before it sets.
Equipment For Peanut Butter Cup Tart
- 9-inch tart pan: A tart pan with a removable bottom makes it easier to serve and gives you clean edges.
- Hand or stand mixer: Whips the filling until it's light and smooth. A stand mixer is easier, but a hand mixer works just fine.
- Double boiler or microwave-safe bowl: Melts the chocolate evenly without burning. If you don't have a double boiler, a heatproof bowl set over a pot of simmering water works perfectly.
- Glass mixing bowl: Helpful for combining the crust ingredients and keeping everything organized.
- Flat-bottomed measuring cup: Presses the crust into the pan evenly and firmly.
- Food processor (optional): Makes quick work of turning graham crackers into crumbs. You can also crush them in a sealed plastic bag with a rolling pin.
Storage and Make-Ahead Tips
This Peanut Butter Cup Tart keeps beautifully in the fridge, which makes it perfect for planning ahead. Store it tightly covered for up to one week. The flavors actually deepen after a day or two, and the layers stay firm and sliceable.
If you want to make it even further in advance, you can freeze the Peanut Butter Cup Tart. Wrap it tightly in plastic wrap and then in foil, and freeze for up to two months. Thaw it in the refrigerator overnight before serving. The texture stays creamy and the crust holds up well.
For the best slices, let the tart chill for at least six hours. If you're in a hurry, four hours will work, but the chocolate topping might be a little softer.
Expert Tips
Use room-temperature butter for the filling. Cold butter won't whip up as smoothly, and you'll end up with a lumpy texture. Let it sit out for about 30 minutes before you start.
Don't skip the crust cooling step. A slightly warm crust helps the filling spread more easily and creates a better seal between the layers.
Wipe your knife between slices. This keeps the edges clean and prevents the chocolate from smudging. A sharp knife works best.
Chill uncovered for the first hour. This lets the chocolate set without condensation forming on top. After the first hour, you can cover it if you're chilling it longer.
Choose the right peanut butter. Stick with creamy, standard peanut butter like Jif or Skippy. Natural peanut butter has too much oil and can make the filling greasy and harder to set.
Serving Suggestions
This Peanut Butter Cup Tart is rich enough to stand on its own, but a few simple pairings make it even better.
Serve it with a dollop of freshly whipped cream to cut through the richness, or add a scoop of vanilla ice cream on the side for a classic combo. A drizzle of salted caramel over each slice adds a sweet and salty contrast that's hard to resist.
For a cozy fall pairing, try it alongside a warm drink like the flavors in Apple Pie Baked Apples, or serve it after a comforting dinner with something light and fruity to balance the chocolate and peanut butter.
If you're serving a crowd, slice the Peanut Butter Cup Tart into smaller wedges. It's rich, so a little goes a long way.
FAQ
Are peanut butter pop tarts discontinued?
Some flavors of Peanut Butter Cup Tart have been discontinued over the years, but the classic frosted peanut butter variety is still available in most stores. If you can't find them locally, check online retailers. For a homemade version with real peanut butter flavor, this Peanut Butter Cup Tart is a great upgrade.
Can you put a peanut butter cup in a cupcake?
Yes, you can press a Peanut Butter Cup Tart into the batter before baking, or push one into the center of a baked cupcake while it's still warm. The chocolate melts slightly and creates a gooey center. It's a fun surprise and adds extra peanut butter chocolate flavor.
What are the four types of tarts?
The four main types are fruit tarts, custard tarts, nut tarts, and chocolate tarts. Fruit tarts often feature fresh berries or poached fruit, custard tarts have a creamy filling like lemon curd, nut tarts include options like pecan or almond, and chocolate tarts showcase rich ganache or mousse. This peanut butter tart falls into the chocolate and nut category.
What is a peanut butter cup?
A peanut butter cup is a round candy made of a peanut butter filling covered in chocolate, most famously made by Reese's. The combination of creamy peanut butter and smooth chocolate has been popular since the 1920s. This Peanut Butter Cup Tart captures that same flavor in a larger, sliceable dessert form.
Related
Looking for other recipes like this? Try these:


Pairing
These are my favorite dishes to serve with Peanut Butter Cup Tart


Peanut Butter Cup Tart
Ingredients
Method
- Preheat oven to 350°F (177°C).
- Make the crust: Stir together the graham cracker crumbs, melted butter, and sugar in a bowl. Press the mixture tightly into a 9-inch tart pan, packing it down firmly with the back of a flat-bottomed measuring cup.
- Bake for 13-15 minutes or until lightly browned around the edges. Remove from the oven and let cool for 15 minutes before adding the filling.
- Make the filling: Beat the softened butter on medium-high speed using a hand mixer or stand mixer until smooth and creamy, about 2 minutes. Add the powdered sugar, vanilla extract, and salt, then beat until fully combined, about 1 minute. Scrape down the sides of the bowl as needed.
- Add the peanut butter and continue mixing until smooth and well incorporated.
- Spread the peanut butter filling evenly into the cooled tart crust. Set aside while you prepare the chocolate topping.
- Make the topping: Melt the chocolate and peanut butter together in a double boiler or microwave. Stir every 15 seconds if using a microwave until fully melted and smooth.
- Pour the melted chocolate mixture over the peanut butter filling and spread evenly. For an extra touch, you can save 1-2 tablespoons of the topping and drizzle it over the finished tart after it sets.
- Chill in the refrigerator, uncovered, for 4-6 hours, or until the tart is firm and fully set. If you plan to chill it for longer than 6 hours, cover the tart.
- Slice and serve once set. Store any leftovers in the fridge for up to 1 week.


