
I burned my first batch. Left them in two minutes too long because I was helping Liam with his homework, and when I opened the oven, the edges were dark and bitter. I stood there staring at them, annoyed with myself.
But the second batch? Perfect. Dark chocolate, a whisper of coffee, and those stamped snowflake patterns crisp as winter air. My sister grabbed one before they'd even cooled all the way and said, "Okay, these are dangerous."
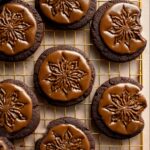
These stamped chocolate espresso cookies don't mess around. They're soft in the middle, just barely fudgy, with that deep cocoa flavor you actually crave. The espresso isn't loud, it just makes everything taste more chocolate. And that thin glaze on top? It dries smooth and catches the light.

Why You'll Love This Stamped Chocolate Espresso Cookies
These Stamped Chocolate Espresso Cookies hit all the right notes. They're rich but not heavy, sweet but balanced with that hint of espresso. The stamped designs make them look professional without any decorating skills required.
They're perfect for gifting, holiday cookie trays, or just when you want something a little more special than your everyday chocolate cookie. And the best part? You can make the dough ahead and bake them fresh whenever you need them.
The texture is what really gets me. Soft and slightly fudgy in the center, with edges that set just enough to hold their shape. That espresso glaze on top adds a smooth finish that makes each bite feel a little luxurious.
Jump to:
- Why You'll Love This Stamped Chocolate Espresso Cookies
- Stamped Chocolate Espresso Cookies Ingredients
- How to Make Stamped Chocolate Espresso Cookies
- Simple Swaps and Variations
- Equipment For Stamped Chocolate Espresso Cookies
- Storage Tips
- Perfect Pairings
- Top Tip
- FAQ
- A Little Kitchen Story
- Related
- Pairing
- Stamped Chocolate Espresso Cookies
Stamped Chocolate Espresso Cookies Ingredients
For the Cookies:
- 1 and ½ cups (188g) all-purpose flour (spooned and leveled)
- ¾ cup (62g) unsweetened cocoa powder (natural or Dutch-process, plus extra for dusting the stamp)
- 2 teaspoons espresso powder
- 1 teaspoon baking powder
- ⅛ teaspoon salt
- ¾ cup (12 Tbsp; 170g) unsalted butter, softened to room temperature
- 1 cup (200g) granulated sugar
- 1 large egg, at room temperature
- 1 teaspoon pure vanilla extract
For the Glaze:
- 1 teaspoon espresso powder
- 2 Tablespoons (30g/ml) warm water
- 1 and ½ cups (180g) confectioners' sugar, sifted
- 2 Tablespoons (30g/ml) milk (dairy or nondairy both work)
How to Make Stamped Chocolate Espresso Cookies
Mixing the Dough
Start by whisking together your flour, cocoa powder, espresso powder, baking powder, and salt in a medium bowl. Set that aside while you work on the wet ingredients.
In a large bowl, beat the softened butter and sugar together with a handheld or stand mixer on medium-high speed. It'll take about 3 minutes to get smooth and creamy. Add the egg and vanilla, then beat for another minute on medium-high until everything's combined. Scrape down the sides and bottom of the bowl to make sure nothing's hiding down there.
Add your dry ingredients to the wet ingredients and mix on low speed just until combined. The dough will be soft and sticky, which is exactly what you want. Cover the bowl tightly and pop it in the refrigerator for at least 1 hour. You can leave it for up to 2 days if you're planning ahead.

Stamping the Cookies
Line your baking sheets with parchment paper or silicone mats. Once your dough is chilled, scoop out heaping tablespoons (about 30g each) and roll them into balls. Space them about 3 inches apart on your prepared sheets.
Here's where the fun happens. Take your cookie stamp and place it directly on top of a dough ball, centering it as best you can. Press down firmly until the dough spreads nearly to the edges of the stamp, then lift straight up. If the dough sticks to your stamp, lightly brush some cocoa powder onto the stamp with a pastry brush before stamping the next one. You can brush off any excess cocoa from the cookie tops if you'd like.
Chill the stamped cookies in the refrigerator for 1 hour before baking. This helps them hold their beautiful design.

Baking
Preheat your oven to 350°F (177°C).
Bake the cookies until the edges are set, about 11 to 13 minutes. They might look slightly underdone in the center, but they'll firm up as they cool. Let them sit on the baking sheet for 5 minutes before transferring to a cooling rack to cool completely.

Making the Glaze
In a medium bowl, mix the espresso powder and warm water with a fork or small whisk until the powder dissolves. Whisk in the sifted confectioners' sugar and milk. If your glaze seems too thick, add a splash more milk. If it's too thin, add a bit more confectioners' sugar.

Once your cookies are completely cool, brush the glaze on top with a pastry brush, or dip the cookie tops directly into the glaze. The glaze will set in about an hour, giving you that smooth, bakery-style finish.
Simple Swaps and Variations
No espresso powder? You can use finely ground instant coffee instead. The flavor will be a bit milder and the texture slightly less smooth, but it still works. Or skip the coffee element entirely and add ½ teaspoon vanilla extract to the glaze instead.
Don't have cookie stamps? No problem. You can shape these like regular chocolate sugar cookies and still dip them in that delicious espresso glaze. They'll taste just as good.
Want to make them ahead? The dough keeps in the fridge for up to 2 days, or you can freeze unbaked dough balls for up to 3 months. Thaw them completely, then stamp and bake as usual. Baked Stamped Chocolate Espresso Cookies freeze beautifully too, just add fresh glaze after thawing for the best results.
Equipment For Stamped Chocolate Espresso Cookies
- Glass mixing bowl
- Whisk
- Electric mixer (handheld or stand mixer, either works)
- Baking sheets
- Silicone baking mats or parchment paper
- Cookie stamps (the star of the show)
- Pastry brush
- Cooling rack
Storage Tips
These Stamped Chocolate Espresso Cookies stay fresh at room temperature for up to a week when stored in an airtight container. The glaze helps seal in moisture, so they stay soft and fudgy longer than you'd expect.
For longer storage, freeze them. Baked Stamped Chocolate Espresso Cookies (with or without glaze) freeze well for up to 3 months. I usually freeze mine without the glaze and add it fresh when I'm ready to serve them. Thaw at room temperature for an hour or so, and they're good as new.
Perfect Pairings
These chocolate coffee desserts pair beautifully with a hot cup of coffee or a cold glass of milk. I also love serving them alongside Snowball Cookies Recipe with just 5 ingredients! for a nice contrast, the chocolate and vanilla look gorgeous together on a cookie plate.
For a cozy holiday dessert spread, try them with Best Eggnog Bread Pudding Recipe or after a slice of Easy Moist Spice Cake Recipe. The coffee and chocolate flavors complement warm spices really nicely.
They're also perfect for gifting. Stack them in a clear cellophane bag tied with ribbon, and you've got a homemade gift that actually looks homemade in the best way possible.
Top Tip
Here's something I learned by accident: if you slightly under-bake these by a minute or so, they stay extra fudgy in the center. The edges still set perfectly, but the middle has this almost brownie-like texture that's absolutely incredible.
Also, don't skip that second chill after stamping. I tried baking them right away once because I was impatient, and the designs puffed up and got a little blurry. That hour in the fridge really does make a difference in how crisp those Stamped Chocolate Espresso Cookies patterns stay.

FAQ
What does adding espresso to cookies do?
Espresso powder deepens the chocolate flavor without making the Stamped Chocolate Espresso Cookies taste like coffee. It's like turning up the volume on chocolate, bringing out all those rich, complex notes. A little goes a long way, and most people won't even know it's there. Pro tip: keep espresso powder in your pantry for any chocolate baking, it's a game changer.
Do you Stamped Chocolate Espresso Cookies before or after baking?
Always stamp before baking. The dough needs to be chilled and firm so it holds the design, then you stamp it, chill again, and bake. If you tried stamping after baking, the cookies would just crumble. The beauty of Stamped Chocolate Espresso Cookies is that the design bakes right in and stays crisp and clear.
What can I use if I don't have a cookie stamp?
You can use the bottom of a glass dipped in sugar to flatten them, or shape them like regular drop Stamped Chocolate Espresso Cookies. They won't have the decorative pattern, but they'll taste just as delicious. You could also use a fork to make a crisscross pattern if you want some texture on top.
Which cookie is the easiest to make?
If you're looking for simple, classic drop cookies like chocolate chip are hard to beat. But these Stamped Chocolate Espresso Cookies aren't complicated at all, they just need a little patience for the chilling time. The actual mixing and stamping is really straightforward, and the results look way more impressive than the effort required.
A Little Kitchen Story
Last December, I was making these Stamped Chocolate Espresso Cookies with my sister Karla. She grabbed the cookie stamp, pressed down on the first dough ball, and lifted it up. The whole thing came with it, stuck to the stamp like glue.
"Well, that's not right," she laughed, dangling the dough in the air.
I grabbed the cocoa powder and dusted the stamp lightly with a pastry brush, and it worked like magic. No more sticky disasters. She made the next one and grinned. "Okay, I'm officially a cookie artist now."
By the time we finished stamping two dozen, Karla had taste-tested three (quality control, she said), and declared them "dangerously good." The espresso glaze was still setting when half the batch mysteriously disappeared.
Related
Looking for other recipes like this? Try these:


Pairing
These are my favorite dishes to serve with Stamped Chocolate Espresso Cookies


Stamped Chocolate Espresso Cookies
Ingredients
Equipment
Method
- Combine the flour, cocoa powder, espresso powder, baking powder, and salt in a medium bowl and whisk until evenly blended.
- In a large mixing bowl, cream the softened butter and sugar on medium-high speed until pale, fluffy, and smooth.
- Blend in the egg and vanilla extract, then scrape down the bowl and mix again until fully incorporated.
- Gradually add the dry mixture to the bowl and mix on low speed just until a soft, sticky dough forms.
- Cover the dough tightly and refrigerate until firm, at least one hour or up to two days.
- Line baking sheets with parchment or silicone mats, portion chilled dough into heaping tablespoon-sized pieces, and roll into smooth balls spaced several inches apart.
- Press a cookie stamp firmly onto each dough ball, lifting straight up to reveal the design, dusting the stamp lightly with cocoa powder if sticking occurs.
- Return the stamped cookies to the refrigerator and chill again for one hour to help them hold their shape.
- Preheat the oven to 350°F (177°C).
- Bake until the cookie edges look set but centers remain soft, then cool briefly on the pan before transferring to a rack to cool completely.
- Dissolve the espresso powder in warm water, whisk in the confectioners' sugar and milk, and adjust thickness as needed.
- Brush or dip the cooled cookies with glaze and allow them to rest until the topping firms up.


Leave a Reply