
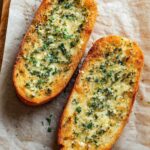
This buttery, garlicky homemade garlic bread is everything you want in a side dish-crispy golden edges, soft pillowy center, and enough garlic butter to make you want to lick your fingers. The fresh parsley and a hint of parmesan take it from basic to bakery-worthy, and it's ready in just 30 minutes.

This recipe works beautifully alongside Cornbread Muffins for a bread-heavy spread, or next to cozy bowls paired with Mini No-Bake Cheesecakes for dessert. It's simple, uses everyday ingredients, and tastes like it came straight from an Italian bakery.
Why You'll Love This Garlic Bread
Homemade garlic bread beats store-bought every single time. You control the garlic level, the butter ratio, and the crispiness no more rubbery, under-seasoned disappointments.
This recipe is fast. Ten minutes of prep, less than twenty in the oven, and you've got a side dish that makes any meal feel special. It's perfect for weeknight pasta, holiday dinners, or even just snacking straight off the baking sheet (no judgment here).
The garlic butter is the star. Fresh garlic, softened butter, parsley, and a little parmesan blend into a spread that melts into every nook of the bread. You can make the butter days ahead and keep it in the fridge, so garlic bread becomes a five-minute decision.
And it freezes beautifully. Assemble a few loaves, wrap them up, and bake them straight from the freezer whenever you need a last-minute side. You'll always have crispy garlic bread ready to go.
Jump to:
Garlic Bread Ingredients
Here's what goes into this buttery garlic bread:
See Recipe Card Below This Post For Ingredient Quantities
- Crusty bread: A 12-ounce loaf with a sturdy crust and soft interior works best. Look for Italian, French, or sourdough bread-something that can hold up to the butter without getting soggy.
- Unsalted butter: Softened butter makes it easy to blend the garlic and herbs. Starting with room-temperature butter gives you a smooth, spreadable mixture.
- Fresh parsley: Adds color, brightness, and a light herby flavor. Fresh parsley tastes better than dried in this recipe.
- Fresh garlic: Finely minced garlic gives you that bold, punchy flavor. Fresh garlic is worth it here-jarred minced garlic won't taste the same.
- Flaky sea salt: Balances the richness and brings out the garlic and butter flavors. If you're using fine salt, cut the amount in half.
- Parmesan cheese (optional): Freshly grated parmesan adds a salty, nutty depth. It's not required, but it makes the garlic butter taste even better.
- Crushed red pepper flakes (optional): A pinch on top adds a tiny kick of heat and looks pretty.
How to Make Homemade Garlic Bread
This recipe comes together fast and requires just a few simple steps.
Preheat oven: Set your oven to 400°F (204°C) and line a baking sheet with parchment paper or a silicone mat. Slice the bread in half horizontally and place both halves cut-side up on the sheet.
Make the garlic butter: In a bowl, beat the softened butter, parsley, minced garlic, salt, and parmesan (if using) until smooth and well combined. You can use a handheld mixer, stand mixer, or just mash it with a fork if the butter is soft enough.

Spread the butter: Spread the garlic butter mixture evenly over both cut sides of the bread. Make sure you get it all the way to the edges so every bite is flavorful.

Bake: Bake for 16 to 18 minutes, until the edges are golden and crispy. If you want extra crunch, leave it in a few minutes longer-just watch so it doesn't burn.
Cool and slice: Let the bread cool on the baking sheet for a minute or two, then transfer to a cutting board. Sprinkle with crushed red pepper flakes if you like, then slice with a serrated knife and serve warm.
Substitutions & Variations
You can tweak this garlic toast recipe to fit what you have on hand.
Bread options: Any sturdy, crusty loaf works. Try ciabatta, baguette, sourdough, or even a soft Italian loaf. Avoid sandwich bread-it'll get too soggy.
Butter swap: You can use salted butter and skip the added salt. For a dairy-free version, use vegan butter or olive oil, though the texture will be slightly different.
Herb swaps: Swap parsley for fresh basil, oregano, or a mix of Italian herbs. Dried herbs work in a pinch, but use about half the amount since dried herbs are stronger.
Cheese variations: Try mozzarella, asiago, or pecorino instead of parmesan. Or skip the cheese entirely for a lighter version.
Garlic intensity: Love garlic? Add an extra clove or two. Want it milder? Cut back to two cloves.
Equipment For Garlic Bread
You don't need anything fancy to make this oven-baked garlic bread.
- Serrated knife: For slicing the bread horizontally and cutting it into portions after baking.
- Garlic press or knife: A garlic press makes quick work of mincing, but a sharp knife works just as well.
- Mixing bowl: For blending the garlic butter.
- Handheld or stand mixer (optional): Makes mixing the butter easier, but a fork works fine if the butter is soft.
- Baking sheet: A rimmed baking sheet keeps everything contained.
- Parchment paper or silicone mat: Prevents sticking and makes cleanup easier.
Storage & Make-Ahead Tips
This recipe is perfect for planning ahead.
Garlic butter: Make the butter up to three weeks in advance and store it in an airtight container in the fridge. Let it soften at room temperature before spreading.
Make-ahead assembly: Assemble the garlic bread through step 3, wrap it tightly in parchment and foil, and freeze for up to three months. Bake straight from frozen, adding a few extra minutes to the baking time.
Storing leftovers: Wrap leftover slices in foil and store in the fridge for up to three days. Reheat in a 350°F oven for 5 to 7 minutes to crisp them back up.
Freezing baked bread: You can freeze baked slices, but they won't be quite as crispy after reheating. Wrap them well and freeze for up to two months.
Serving Suggestions
Homemade garlic bread pairs with so much more than pasta.
Serve it alongside a big bowl of tomato soup or minestrone for dipping. The crispy edges hold up perfectly to broth.
Pair it with a fresh Caesar salad or a simple arugula and tomato salad for a light meal. The buttery, garlicky flavor complements greens beautifully.
Use it as a base for bruschetta. Top slices with diced tomatoes, basil, and balsamic for an easy appetizer.
Serve it next to Apple Turnovers or Strawberry Cake Roll for a sweet-and-savory dinner spread that feels a little fancy.
Expert Tips
Use fresh garlic. Jarred minced garlic has a different flavor and won't taste as bright or punchy.
Soften your butter completely before mixing. Cold butter won't blend well with the garlic and herbs, and you'll end up with clumps.
Don't skip the parchment or silicone mat. It keeps the bread from sticking and makes cleanup a breeze.
Slice the bread evenly. Cut it horizontally so both halves are about the same thickness-this helps them bake evenly.
Watch the oven closely during the last few minutes. Garlic bread can go from golden to burnt quickly, so keep an eye on it.
Let it cool for a minute before slicing. This gives the butter time to set slightly and makes slicing cleaner.
For a softer texture, wrap the baked bread in foil and let it steam for a minute or two. For extra crispy edges, leave it unwrapped.
FAQ
How do I get my garlic bread extra crispy?
Bake it a few minutes longer than the recipe calls for, and make sure your oven is fully preheated. You can also switch the oven to broil for the last minute or two-just watch it closely so it doesn't burn. Using a crusty artisan loaf also helps.
What is the best bread to use for garlic bread?
A crusty, sturdy loaf like Italian, French, sourdough, or ciabatta works best. You want something with a firm crust and a soft interior that can hold up to the butter without getting soggy. Avoid soft sandwich bread.
Can I make garlic bread ahead of time?
Yes. You can make the garlic butter up to three weeks ahead and store it in the fridge. You can also assemble the entire loaf through step 3, wrap it tightly, and freeze it for up to three months. Bake it straight from frozen when you're ready.
How long can I store garlic bread?
Store leftover baked slices wrapped in foil in the fridge for up to three days. Reheat in a 350°F oven for 5 to 7 minutes to bring back the crispiness. You can also freeze baked or unbaked garlic bread for up to three months.
Related
Looking for other recipes like this? Try these:


Pairing
These are my favorite dishes to serve with Garlic Bread


Homemade Garlic Bread
Ingredients
Method
- Preheat the oven to 400°F (204°C) and line a baking sheet with parchment paper or a silicone mat.
- Place the cut sides of both bread halves facing up on the prepared baking sheet.
- In a mixing bowl, combine the softened butter, parsley, garlic, salt, and Parmesan (if using). Mix with a fork or electric mixer until smooth and fully incorporated.
- Spread the garlic butter evenly over the cut side of each bread half.
- Bake in the preheated oven for 16-18 minutes, or until the edges are golden and slightly crisp. Adjust time by a few minutes for extra crunch.
- Let the bread cool for a few minutes on the baking sheet before transferring it to a cutting board. Sprinkle with crushed red pepper flakes, if desired. Slice with a serrated knife and serve warm.
- Store any leftover bread tightly wrapped at room temperature or in the refrigerator for up to 3 days.


Leave a Reply