
These chewy, crunchy salted quinoa granola bars hit that sweet spot between wholesome and indulgent. I started making them on Sunday afternoons when I needed something quick to grab during the week, and they've become my go-to for busy mornings. The combination of dates, honey, and a sprinkle of flaky sea salt makes them taste almost like the kind you'd buy at a fancy café, but they come together in less than half an hour of active work.

If you love simple snacks like my Strawberry Lemon Blondies or Chocolate Mint Cookies, you'll want to keep a batch of these in your freezer.
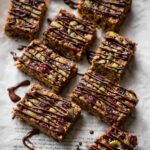
What Makes These Salted Quinoa Granola Bars Special
Homemade Salted Quinoa Granola Bars often fall into two camps: either they're too dry and crumbly, or they're so soft they fall apart in your hand. These salted quinoa granola bars walk the line perfectly. The dates and almond butter create a naturally sticky base that holds everything together without being overly sweet or processed.
The quinoa adds a gentle crunch that's different from oats alone, and the pepitas give each bite a satisfying chew. When you drizzle dark chocolate over the top and finish with flaky sea salt, you get that sweet-salty combination that keeps you coming back for one more piece.
Jump to:
Salted Quinoa Granola Bars Ingredients
Here's everything that goes into these healthy Salted Quinoa Granola Bars recipe beauties.
See Recipe Card Below This Post For Ingredient Quantities
- Medjool dates: These create the sticky, caramel-like base that holds everything together. Soaking them in hot water makes them easier to blend into a smooth paste.
- Almond butter: Adds richness and helps bind the mixture. You can use any nut or seed butter you prefer, just make sure it's the kind you need to stir before using.
- Honey: Gives a touch of sweetness and helps the bars stay chewy. You can swap in maple syrup if you want to keep these vegan.
- Vanilla extract: A small amount brightens up all the other flavors.
- Old-fashioned rolled oats: Forms the hearty base of the bars. Don't use quick oats, they'll turn mushy.
- Uncooked quinoa: Adds a gentle crunch and boosts the protein content. It softens slightly as the bars bake but still gives great texture.
- Coarsely chopped almonds: Gives the bars a satisfying bite. You can use any nut you like or leave them out if you have allergies.
- Pepitas (pumpkin seeds): These add a mild, nutty flavor and a chewy texture that balances the crunch from the quinoa.
- Sweetened dried cranberries: Brings little bursts of tartness throughout. You can use any dried fruit, like chopped apricots or cherries.
- Chia seeds (optional): Helps bind everything and adds a nutritional boost, but the bars work fine without them.
- Salt: Balances the sweetness and makes all the flavors pop.
- Semi-sweet or bittersweet chocolate: Melted and drizzled over the top for a little indulgence. Dark chocolate works beautifully here.
- Flaky sea salt: The finishing touch that makes these bars feel special. Don't skip it.
How to Make Salted Quinoa Granola Bars
These come together in a few simple steps, though your arms might get a little workout when stirring.
Preheat oven: Preheat your oven to 300°F (149°C). Line an 8-inch square baking pan with parchment paper, making sure to leave some overhang on the sides so you can lift the bars out easily later.
Prepare the dates: Drain your soaked dates well and toss them into a food processor. Pulse until they turn into a chunky paste, scraping down the sides once or twice. Transfer this sticky mixture to a large bowl.
Combine wet ingredients: Add the almond butter, honey, and vanilla to the date paste. Use a silicone spatula to stir everything together until it's fully combined and smooth. It'll be thick and glossy.

Mix dry ingredients: In a medium bowl, combine the oats, quinoa, almonds, pepitas, cranberries, chia seeds if using, and salt. Give it a good stir so everything's evenly distributed.
Combine wet and dry ingredients: Pour the dry mixture into the bowl with the wet ingredients. Now comes the arm workout-stir everything together until it's evenly combined. It'll feel dense and sticky, like you're mixing thick cookie dough. That's exactly what you want.

Press mixture into pan: Scrape the mixture into your prepared baking pan. Use the back of a measuring cup or your hands to press it down firmly and evenly. Really pack it in there, pressing hard to eliminate any air pockets. The tighter you press, the better the bars will hold together.
Bake: Bake for 20 to 22 minutes, until the edges are lightly browned and the center looks set. Remove from the oven and let the pan cool on a cooling rack for 1 full hour. Don't rush this part.
Chill: After the bars have cooled at room temperature, transfer the whole pan to the refrigerator for 1 additional hour. This helps them firm up completely.
Melt the chocolate: When you're ready to finish the bars, place your chopped chocolate in a microwave-safe bowl. Melt it in 20-second bursts, stirring well between each interval, until it's completely smooth and glossy.
Cut the bars: Use the parchment overhang to lift the cooled slab out of the pan and onto a cutting board. Cut into 16 bars using a sharp knife. Drizzle the melted chocolate over the top in a zigzag pattern, then sprinkle with flaky sea salt while the chocolate is still wet.
Chill to set: Pop the bars back in the refrigerator for about 30 minutes to let the chocolate harden.
Storage: Keep the bars at room temperature in an airtight container for up to 1 week, refrigerate for up to 2 weeks, or wrap individually and freeze for up to 3 months.
Smart Substitutions
You can make these Salted Quinoa Granola Bars work with what you have on hand.
Swap the almond butter for cashew butter, peanut butter, or sunflower seed butter if you have nut allergies. Just make sure it's the natural kind that needs stirring.
Use maple syrup instead of honey if you want to keep these vegan. The texture will be nearly identical.
Replace the cranberries with raisins, chopped dried apricots, cherries, or even mini chocolate chips if you're feeling indulgent.
If you don't have quinoa, you can use the same amount of additional oats, though you'll lose some of that nice crunch.
Try walnuts or pecans in place of the almonds, or use sunflower seeds for a nut-free version.
Skip the chocolate drizzle entirely if you want a simpler, less sweet Salted Quinoa Granola Bars. They're still delicious without it.
Equipment For Salted Quinoa Granola Bars
You don't need anything fancy for these Salted Quinoa Granola Bars, just the basics.
- An 8-inch square baking pan is the right size to get bars that are thick and chewy. A 9x9 pan will work but the bars will be a bit thinner.
- Parchment paper makes it easy to lift the bars out cleanly. Don't skip this or you'll be prying them out with a spatula.
- A food processor helps you break down the dates into a smooth paste quickly. You can mash them by hand if needed, but it takes more effort.
- Glass mixing bowls are sturdy enough for all that stirring. One large, one medium.
- A silicone spatula gives you the leverage you need to mix that thick, sticky dough.
- A cooling rack lets air circulate under the pan so the bars cool evenly.
- A microwave-safe bowl makes melting the chocolate quick and easy.
How to Store These Salted Quinoa Granola Bars
These Salted Quinoa Granola Bars keep beautifully, which makes them perfect for meal prep.
At room temperature, store them in an airtight container for up to 1 week. They'll stay chewy and won't dry out.
In the refrigerator, they'll last up to 2 weeks. I actually like them cold-the texture gets a little firmer and the chocolate stays snappy.
For freezer storage, wrap each bar individually in parchment or wax paper, then place them all in a freezer bag. They'll keep for up to 3 months. Let them thaw at room temperature for about 20 minutes before eating, or eat them straight from the freezer for a firmer, almost candy bar-like texture.
Serving Ideas
These homemade Salted Quinoa Granola Bars are pretty versatile.
Pack them in lunchboxes alongside fresh fruit and cheese for a balanced snack. They travel well and don't get squished easily.
Crumble one over a bowl of yogurt and berries for breakfast. The chocolate-salt combo works really well with tangy Greek yogurt.
Serve them with a cup of coffee or tea in the afternoon when you need a little energy boost. They're filling without being too heavy.
Pair them with a glass of cold almond milk after a workout. The protein from the nuts and quinoa makes them a decent post-gym snack.
If you're looking for more treat-style snacks, try my Mini Lemon Meringue Tarts or Pear Crumble for something a bit sweeter.
Expert Tips
Press firmly. The number one reason Salted Quinoa Granola Bars fall apart is not packing the mixture tightly enough. Really use some muscle when pressing it into the pan.
Don't skip the chill time. Both the room temperature cooling and the refrigerator time are important. Cutting the Salted Quinoa Granola Bars too early will result in crumbly edges.
Soak the dates well. If your dates are dry or old, soak them for the full 10 minutes in hot water. This makes them blend smoothly and creates a better binding paste.
Customize freely. These Salted Quinoa Granola Bars are forgiving. Swap in your favorite nuts, seeds, or dried fruit and they'll still turn out great.
FAQ
How do you make healthy granola bars at home?
Start with a sticky base of dates and nut butter, mix in oats and your favorite add-ins, press the mixture firmly into a pan, and bake at a low temperature until set. The key is packing the mixture tightly so the bars hold together. My mom always says the tighter you press, the better they'll slice.
Can I freeze quinoa granola bars?
Yes! Wrap each bar individually in parchment paper, then store them all in a freezer-safe bag for up to 3 months. They thaw quickly at room temperature, or you can eat them frozen for a firmer texture. I keep a stash in my freezer for those mornings when I'm running late.
What are the benefits of adding quinoa to granola bars?
Quinoa adds protein, a subtle crunch, and a slightly nutty flavor that complements oats beautifully. It also boosts the nutritional value without making the bars taste too "healthy." Plus, it stays a bit crunchy even after baking, which gives these Salted Quinoa Granola Bars a better texture than oats alone.
How long do homemade granola bars last?
At room temperature in an airtight container, they'll stay fresh for up to 1 week. In the refrigerator, they last up to 2 weeks. For longer storage, freeze them for up to 3 months. Just make sure they're completely cooled before storing, or condensation can make them soggy.
Related
Looking for other recipes like this? Try these:


Pairing
These are my favorite dishes to serve with Salted Quinoa Granola Bars


Salted Quinoa Granola Bars
Ingredients
Method
- Preheat the oven to 300°F (149°C). Line an 8-inch square baking pan with parchment paper, ensuring enough overhang for easy removal.
- Drain the soaked dates, then pulse them in a food processor until they form a chunky paste. Transfer to a large bowl. Add almond butter, honey, and vanilla extract, stirring until combined.
- In a separate bowl, combine oats, quinoa, chopped almonds, pepitas, cranberries, chia seeds, and salt. Stir to combine.
- Add the dry ingredients to the bowl with the wet mixture. Stir until thoroughly combined. This will take some effort, so be sure everything is well incorporated.
- Transfer the mixture into the prepared baking pan, pressing it down firmly to form an even layer.
- Bake for 20-22 minutes, or until the edges are lightly browned and the center is set. Let cool completely in the pan on a cooling rack for 1 hour. Then transfer to the refrigerator for another hour to chill.
- Melt the chopped chocolate by microwaving in 20-second intervals, stirring between each, until completely smooth and melted.
- Lift the granola bars out of the pan using the parchment paper overhang, and transfer them to a cutting board. Cut into 16 bars. Drizzle with melted chocolate before or after cutting, then sprinkle with flaky sea salt.
- Refrigerate the bars for 30 minutes to set the chocolate.
- Store the bars at room temperature for up to 1 week, or refrigerate for up to 2 weeks. Freeze for up to 3 months if individually wrapped.


Leave a Reply