
These creamy, tangy Key Lime Pie Bars bring all the bright, zesty flavor of classic key lime pie into an easy-to-serve square. The buttery graham cracker crust pairs perfectly with the smooth, citrusy filling, and the best part? They come together with just a handful of simple ingredients. I first made these for a summer potluck after trying a slice at a beachside café, and I knew I had to recreate that perfect balance of tart and sweet at home.

They remind me of lazy afternoons and the kind of dessert that disappears fast, just like my No Bake Peanut Butter Oatmeal Bars or a slice of Lemon Layer Cake. If you love working with a buttery Graham Cracker Crust, you're going to adore these bars.
Why You'll Love This Key Lime Pie Bars
These Key Lime Pie Bars are everything you want in a dessert tangy, creamy, and so satisfying. They're incredibly easy to make, even if you've never tackled a key lime pie before. The crust is foolproof, the filling comes together in minutes, and you don't need any fancy techniques or equipment.
They're also the perfect make-ahead treat. You can prep them the day before a gathering, chill them overnight, and serve them straight from the fridge. The tangy lime flavor is refreshing without being too sweet, and the creamy texture melts on your tongue. Plus, cutting them into neat little squares makes serving a breeze.
Jump to:
Key Lime Pie Bars Ingredients
Here's everything you'll need to make these tangy, creamy Key Lime Pie Bars. The ingredient list is short and sweet, which is one of the reasons I love this recipe so much.
See Recipe Card Below This Post For Ingredient Quantities
For the Crust:
- Graham crackers : These form the buttery, slightly sweet base that holds everything together. You can buy pre-made crumbs, but crushing whole crackers gives you a fresher flavor.
- Butter, melted: Binds the crumbs and adds richness. Melted butter makes the crust easy to press into the pan.
- Granulated sugar: Adds a touch of sweetness to balance the tangy filling.
For the Filling:
- Cream cheese, softened to room temperature: Creates a smooth, creamy texture and adds richness to the filling. Make sure it's softened so it blends easily without lumps.
- Egg yolks: Help the filling set and add a silky, custard-like texture.
- Sweetened condensed milk: The magic ingredient that makes the filling thick, creamy, and sweet without needing extra sugar.
- Key lime juice: Brings that signature tangy, citrusy flavor. You can use bottled key lime juice or fresh if you have it.
- Lime zest : Adds a burst of fresh lime aroma and intensifies the citrus flavor.
Optional Garnish:
- Whipped cream: Adds a light, fluffy topping that balances the tartness.
- Lime slices: Makes the bars look beautiful and adds a fresh pop of color.
How to Make Key Lime Pie Bars
These Key Lime Pie Bars come together in just a few simple steps, and the process is so straightforward that even beginner bakers will feel confident.
Preheat the oven: Preheat your oven to 350°F (177°C). Line a 9-inch square baking pan with parchment paper, leaving an overhang on the sides so you can lift the bars out easily later.
Make the crust: If you're using whole graham crackers, grind them into fine crumbs using a food processor or blender. You can also place them in a zip-top bag and crush them with a rolling pin. In a medium bowl, combine the graham cracker crumbs and granulated sugar. Stir in the melted butter until the mixture looks thick, coarse, and sandy. Press the mixture evenly into the bottom of your prepared baking pan, making sure it's packed down firmly.

Prebake the crust: Bake the crust in the preheated oven for 10 minutes. This step helps it hold together and adds a little extra crunch. Let it cool for a few minutes while you prepare the filling.
Make the filling: Using a handheld or stand mixer with a paddle or whisk attachment, beat the softened cream cheese on medium-high speed until it's smooth and creamy, about 1 minute. Beat in the egg yolks, scraping down the sides of the bowl as needed to make sure everything is well combined. Add the sweetened condensed milk, key lime juice, and lime zest, and mix until the filling is smooth and fully blended. Once everything is mixed, whisk the filling by hand to make sure there are no lumps of cream cheese hiding in there.
Bake the bars: Pour the filling evenly over the prebaked crust, spreading it out gently with a spatula. Bake for 18-20 minutes, or until the edges look set and the center is only slightly jiggly. It should still have a little wobble in the middle, but it will firm up as it cools.
Cool and chill: Remove the bars from the oven and let them cool for 30 minutes at room temperature on a wire rack. After cooling, refrigerate the bars for at least 2-3 hours to allow them to fully set. This chilling time is important, so don't skip it.

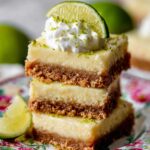
Cut and serve: Once the bars are completely chilled, lift the parchment paper from the pan and transfer the whole slab to a cutting board. Cut the bars into squares using a sharp knife, wiping the blade clean between cuts for neat edges. Garnish with whipped cream, lime slices, and extra lime zest if you like.
Storage: Store the bars in an airtight container in the refrigerator for up to 5 days.
Substitutions & Variations
This Key Lime Pie Bars is pretty straightforward, but here are a few ways you can mix things up:
Regular limes instead of key limes: If you can't find key lime juice, regular lime juice works just fine. The flavor will be slightly less sweet and a bit more tart, but it's still delicious.
Graham cracker alternatives: You can swap the graham crackers for vanilla wafer cookies, digestive biscuits, or even crushed pretzels for a salty-sweet twist.
Make it vegan: Use vegan cream cheese, a can of coconut cream in place of sweetened condensed milk, and replace the egg yolks with a cornstarch slurry (mix 2 tablespoons cornstarch with 3 tablespoons water).
Add a meringue topping: For a more traditional key lime pie look, top the chilled bars with a fluffy meringue and toast it with a kitchen torch.
Equipment For Key Lime Pie Bars
- 9-inch square baking pan: The perfect size for cutting these into neat, even bars.
- Food processor (or rolling pin and zip-top bag): For crushing the graham crackers into fine crumbs.
- Handheld or stand mixer: Makes it easy to beat the cream cheese and blend the filling until it's smooth.
- Mixing bowls: You'll need a couple for the crust and filling.
- Parchment paper: Lines the pan and makes it easy to lift the bars out for cutting.
- Cooling rack: Helps the bars cool evenly before you chill them in the fridge.
Storage Tips
These Key Lime Pie Bars keep beautifully in the fridge, which makes them perfect for making ahead. Store them in an airtight container in the refrigerator for up to 5 days. The tangy flavor actually gets even better after a day or two as the lime juice has more time to meld with the creamy filling.
You can also freeze these Key Lime Pie Bars if you want to make them way ahead of time. Wrap individual bars tightly in plastic wrap, then place them in a freezer-safe container or bag. They'll keep in the freezer for up to 2 months. Thaw them in the fridge overnight before serving.
Serving Suggestions
These Key Lime Pie Bars are delicious on their own, but here are a few ways to make them even more special:
With whipped cream: A dollop of freshly whipped cream on top adds a light, airy contrast to the tangy filling.
Alongside fresh berries: Serve them with a handful of fresh strawberries or raspberries for a pop of color and extra sweetness.
With a scoop of vanilla ice cream: The cold, creamy ice cream pairs beautifully with the tart lime flavor.
At a summer picnic: These Key Lime Pie Bars are easy to transport and serve, making them perfect for outdoor gatherings, barbecues, or potlucks.
Expert Tips
Soften the cream cheese completely: Cold cream cheese will create lumps in your filling, so make sure it's at room temperature before you start. If you're in a hurry, microwave it for about 10 seconds.
Don't overbake: The bars should still have a slight jiggle in the center when you take them out of the oven. They'll firm up as they cool and chill.
Use parchment paper: This makes it so much easier to lift the bars out of the pan for clean, even cuts.
Wipe your knife between cuts: For the neatest-looking bars, wipe the blade with a damp towel after each cut.
Chill them fully: I know it's tempting to cut into them early, but letting them chill for the full 2-3 hours makes all the difference in texture.
FAQ
How do you make key lime pie bars?
You start by making a simple graham cracker crust, prebaking it, then pouring a tangy lime filling made with cream cheese, sweetened condensed milk, egg yolks, and lime juice over the top. Bake until set, then chill for a few hours. My best friend Jackeline says the hardest part is waiting for them to chill.
Can I freeze key lime pie bars?
Yes! Wrap individual bars tightly in plastic wrap, then store them in a freezer-safe container for up to 2 months. Thaw them in the fridge overnight before serving. They taste just as fresh and tangy after freezing.
How do you store key lime pie bars?
Store them in an airtight container in the refrigerator for up to 5 days. The filling stays creamy and the crust holds up beautifully. Just keep them chilled so the filling doesn't soften too much.
What's the best crust for key lime pie bars?
A classic graham cracker crust is perfect because it's buttery, slightly sweet, and holds up well against the creamy filling. You can also try vanilla wafer cookies or even a pretzel crust for a salty-sweet twist.
Related
Looking for other recipes like this? Try these:


Pairing
These are my favorite dishes to serve with Key Lime Pie Bars


Key Lime Pie Bars
Ingredients
Method
- Preheat the oven to 350°F (177°C). Line a 9-inch square baking pan with parchment paper, allowing an overhang on the sides for easy lifting. Set aside.
- For the crust, use a food processor or rolling pin to crush graham crackers into fine crumbs. Mix these crumbs with sugar in a medium bowl, then stir in the melted butter. The mixture should be coarse and sandy. Press the mixture evenly into the bottom of the prepared pan.
- Prebake the crust in the preheated oven for 10 minutes. Allow it to cool for a few minutes while you prepare the filling.
- For the filling, beat the softened cream cheese with a mixer on medium-high speed until smooth, about 1 minute. Add the egg yolks and continue mixing. Scrape down the sides of the bowl as needed. Mix in the sweetened condensed milk, key lime juice, and lime zest until fully combined. After mixing with the mixer, whisk the mixture by hand to ensure there are no lumps. Pour the filling evenly over the warm crust.
- Bake the bars for 18-20 minutes, or until the edges are set and the center is slightly jiggly. Remove from the oven and cool at room temperature for 30 minutes. Chill in the refrigerator for at least 2-3 hours to set completely.
- Once chilled, lift the bars out of the pan using the parchment paper. Cut into squares. Garnish with whipped cream, lime slices, and additional lime zest, if desired.


Leave a Reply