
These extra-soft, buttery Rice Krispie Treats are loaded with gooey marshmallow goodness and stay perfectly chewy for days. I'll never forget the first time I made these with a few simple upgrades, extra butter and vanilla, and watched them disappear faster than my Best Double Chocolate Chip Cookies.

The smell of melted marshmallows filling the kitchen, that golden butter bubbling in the pot, it's the kind of easy magic that makes you feel like a baking genius. Plus, they're ready in about 15 minutes of actual work, which means more time for taste-testing (and less time stuck in the kitchen). If you love simple, no-bake treats like my Cherry Pie Bars, you're going to adore these.
Why You'll Love This Rice Krispie Treats
Quick and easy. These come together in about 15 minutes of hands-on time, then you just wait for them to set. No oven required, which makes them perfect for hot summer days or when you need a last-minute dessert.
Soft and chewy texture. The extra butter and marshmallows create that bakery-style softness that stays put for days. No dry, hard edges here.
Customizable. You can add chocolate chips, sprinkles, or even a drizzle of melted chocolate on top. Kids love getting creative with toppings.
Foolproof. Even if you've never made rice krispie treats before, this recipe works every single time. The steps are simple and forgiving.
Jump to:
Rice Krispie Treats Ingredients
Here's everything for the softest, most flavorful rice krispie treats you've ever tasted.
See Recipe Card Below This Post For Ingredient Quantities
- Unsalted butter: This adds richness and creates that soft, melt-in-your-mouth texture. Using more butter than the standard recipe is what makes these treats extra special.
- Mini marshmallows: Two full bags give you that gooey, stretchy marshmallow flavor in every bite. Mini marshmallows melt faster and more evenly than large ones.
- Pure vanilla extract: Just half a teaspoon adds warmth and depth. It's a small addition that makes a big difference.
- Salt: A tiny pinch balances the sweetness and brings out all the flavors. Don't skip it.
- Crispy rice cereal: The classic base. Make sure each piece gets coated in that marshmallow mixture for the best texture.
How to Make Rice Krispie Treats
These treats come together quickly, so have everything ready before you start.
Prep the pan: Line a 9×13-inch baking pan with parchment paper and give it a light mist of nonstick spray. This makes cleanup easy and helps you lift the treats out cleanly later.
Melt the butter: Place the butter in a large pot over medium heat and let it melt completely. You'll see it start to bubble gently.
Add the marshmallows: Toss in both bags of mini marshmallows and stir constantly until they're completely melted and smooth, about 3 to 4 minutes. The mixture will look glossy and thick.
Stir in vanilla and salt: Remove the pot from the heat immediately, then mix in the vanilla extract and a pinch of salt. Work quickly here because the mixture will start to firm up as it cools.
Fold in the cereal: Add all the crispy rice cereal and fold gently with a silicone spatula until every piece is coated. You want to be thorough but gentle so you don't crush the cereal.

Press into the pan: Transfer the mixture to your prepared pan and spread it out evenly using a lightly greased silicone spatula. Then take a flat spatula, grease the back of it, and press down gently. Don't pack it hard or the treats will turn out dense and tough.

Let them set: Allow the treats to rest at room temperature for at least 1 hour, or up to a full day if you're making them ahead. Cover them if you're leaving them out for more than a few hours.
Cut into squares: Lift the whole slab out using the parchment paper edges, then cut into 20 squares with a sharp knife.
Simple Substitutions
Salted butter: If that's all you have, skip the pinch of salt in the recipe.
Large marshmallows: You can use them, but they'll take a bit longer to melt. Stir frequently to avoid scorching.
Brown butter: For a nutty, caramel-like flavor, brown the butter before adding the marshmallows. Just watch it closely so it doesn't burn.
Add-ins: Fold in chocolate chips, M&Ms, or sprinkles after you add the cereal. About 1 cup of mix-ins works well without overwhelming the treats.
Equipment For Rice Krispie Treats
You don't need anything fancy for this recipe.
- 9×13-inch baking pan: The standard size for sheet pan treats. It gives you perfectly portioned squares.
- Parchment paper: Prevents sticking and makes it easy to lift the treats out for clean cuts.
- Large pot (Dutch oven works great): You need enough room to stir the marshmallows and cereal together without making a mess.
- Silicone spatula: Flexible and nonstick-friendly, perfect for folding and spreading.
- Flat spatula: Greasing the back helps you press the mixture down evenly without it sticking to the spatula.
How to Store Rice Krispie Treats
These treats stay soft and fresh for days when stored properly.
Room temperature: Cover tightly and store in an airtight container for up to 3 days. Layer sheets of parchment or wax paper between the treats to keep them from sticking together.
Freezing: Rice krispie treats can be frozen, though the texture might change slightly after thawing. Wrap individual treats in plastic wrap, then place them in a freezer-safe container with parchment between layers. Freeze for up to 2 months and thaw at room temperature before serving.
Make ahead: You can make these a day in advance. Just cover the pan tightly and leave them at room temperature until you're ready to cut and serve.
What Makes These Rice Krispie Treats Special
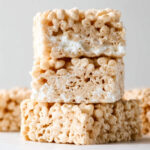
Most rice krispie treats turn out hard, dry, or stick to your teeth like glue. Not these. The secret is in the ratio: more butter, more marshmallows, and a splash of vanilla extract that makes everything taste homemade instead of like something from a box. These treats are soft enough to bite through easily but still hold their shape when you cut them into perfect squares.
I've been making this recipe for years, and it's become my go-to whenever I need a crowd-pleaser. They're just as popular at bake sales as they are in lunchboxes, and honestly, they taste better than anything you'd buy at the store.
Expert Tips
Use fresh marshmallows. Stale marshmallows won't melt as smoothly and can make your treats tough.
Don't overheat the mixture. Once the marshmallows are melted, remove the pot from heat right away. Overheating makes the treats hard and chewy in a bad way.
Grease everything. A light coating of nonstick spray or butter on your spatulas and hands makes handling the sticky mixture so much easier.
Press gently. This is the most important tip. Pressing too hard compacts the treats and makes them dense. You want them light and airy.
Let them cool completely. Cutting too soon will give you messy, uneven squares. Patience pays off here.
Serving Suggestions
These treats are delicious on their own, but here are a few ways to make them even more special.
With a glass of cold milk: Classic pairing that never gets old, especially for kids.
Alongside fresh fruit: Strawberries, raspberries, or sliced apples add a fresh contrast to the sweet, chewy treats.
Ice cream sandwiches: Slice the treats a bit thicker, add a scoop of vanilla ice cream between two squares, and press gently. Freeze for 30 minutes before serving.
Party platter: Cut into smaller bite-sized pieces and arrange on a platter with other no-bake desserts like my Easy Strawberry Peach Galette for a fun dessert spread.
FAQ
What is the trick to making rice crispy treats?
The trick is using extra butter and marshmallows, then pressing the mixture gently into the pan instead of packing it down hard. This keeps the treats soft and chewy instead of tough and dense.
What is the secret ingredient in Rice Krispie treats?
Vanilla extract is the secret ingredient. Just half a teaspoon adds warmth and makes the treats taste homemade instead of plain. A pinch of salt also helps balance the sweetness.
What are some common mistakes when making rice krispies treats?
The biggest mistake is pressing too hard when spreading the mixture, which makes them dense. Other common mistakes include using old marshmallows, overheating the mixture, or not using enough butter. Stick to the recipe and handle the mixture gently for the best results.
Why do athletes eat Rice Krispie treats?
Athletes eat rice krispie treats because they're a quick source of carbohydrates and sugar, which provide fast energy before or after workouts. They're easy to digest and portable, making them a convenient snack for training and competition days.
Related
Looking for other recipes like this? Try these:


Pairing
These are my favorite dishes to serve with Rice Krispie Treats


Rice Krispie Treats
Ingredients
Method
- Line a 9x13-inch pan with parchment paper and lightly coat the surface so nothing sticks.
- Place the butter in a very large pot over medium heat and let it melt completely before adding the marshmallows, then stir until the mixture becomes smooth and fully melted.
- Take the pot off the heat and immediately stir in the vanilla and salt until evenly distributed.
- Add the cereal and gently fold until every piece is coated with the marshmallow mixture.
- Scoop the mixture into the prepared pan and use a lightly greased spatula to spread it out, then gently press it in without compacting it.
- Let the slab rest at room temperature for at least one hour so it can firm up before cutting.
- Lift the slab out using the parchment edges and slice into even squares.


Leave a Reply