
These Red Velvet Oreo Brownies bring together fudgy, tender brownies with a gorgeous red hue and chunks of chocolate Oreos baked right in. I first made these on a rainy Saturday when I wanted something special but didn't feel like making a layered cake, and honestly, they disappeared faster than anything I've baked in months. The best part? They come together in one bowl, need less than 40 minutes total, and give you that beautiful crackly top without any fuss.

If you love easy desserts with big flavor, you might also enjoy these Chocolate Lava Cookies or my Brown Butter Caramel Cake for your next gathering.
What Makes Red Velvet Oreo Brownies So Special
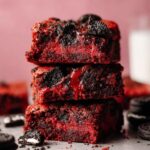
Red velvet has this soft, velvety texture that's somewhere between chocolate cake and vanilla cake, with just a hint of cocoa and a slight tang from the vinegar. When you bake it into Red Velvet Oreo Brownies form and fold in Oreos, you get this incredible combination of chewy edges, fudgy centers, and crunchy cookie pieces in every bite.
These Red Velvet Oreo Brownies don't require a stand mixer, complicated folding techniques, or waiting for anything to come to room temperature. You melt the butter, whisk everything together, fold in the Oreos, and bake. The crackly top forms naturally if you whisk the eggs and sugar long enough, and the red color makes them look bakery-fancy without any extra effort.
Jump to:
Red Velvet Oreo Brownies Ingredients
Here's everything you need to make these Red Velvet Oreo Brownies from scratch.
See Recipe Card Below This Post For Ingredient Quantities
- Salted butter: Melted butter creates the fudgy texture and rich flavor in these brownies. Starting with salted butter adds a nice balance to the sweetness.
- Granulated sugar: Provides sweetness and helps create that signature crackly top when whisked with the eggs.
- Brown sugar, packed: Adds moisture and a hint of caramel flavor that makes the brownies extra tender and chewy.
- Large eggs: Bind everything together and give the brownies their structure. Whisking them well with the sugar is key to getting that shiny, crackly top.
- Vanilla extract: Enhances all the other flavors and adds warmth to the overall taste.
- White vinegar: This is what gives red velvet its slight tang and helps activate the cocoa powder for a softer crumb.
- Red gel food coloring: Gel food coloring gives you that vibrant red hue without adding extra liquid to the batter. Wilton gel colors work beautifully and a little goes a long way.
- All-purpose flour, spooned and leveled: Forms the base structure of the brownies. Spooning and leveling prevents you from accidentally adding too much, which would make them cakey instead of fudgy.
- Cocoa powder: Adds just enough chocolate flavor to give these that classic red velvet taste without overpowering the other flavors.
- Salt: Balances the sweetness and brings out all the flavors in the brownie.
- Oreos, broken into pieces: The star of the show! Breaking them into chunks instead of crushing them completely gives you nice pockets of crunchy cookie throughout the brownies.
How to Make Red Velvet Oreo Brownies
Preheat the oven: Set your oven to 350°F. Spray a 9x9-inch ceramic or metal baking pan with nonstick spray, then line it with parchment paper so the paper stays in place and the brownies lift out easily later.
Make the brownie batter: Melt the butter in a large or medium mixing bowl. Whisk in the granulated sugar and packed brown sugar until smooth. Add the eggs and vanilla extract, then whisk vigorously for about 2 full minutes to help develop that beautiful crackly top. Whisk in the white vinegar, then add your gel food coloring a little at a time until you reach the red shade you want.

Mix in the dry ingredients: Gently fold in the all-purpose flour, cocoa powder, and salt using a spatula or wooden spoon. Stir just until everything is combined and you don't see any dry streaks, but don't overmix or the brownies will get tough.
Add the Oreos: Break up the Oreos into chunks, then fold about two-thirds of them into the batter. Pour the batter into your prepared pan and spread it out evenly with a spatula. Sprinkle the remaining Oreo pieces on top so they bake into the surface.

Bake the brownies: Bake for 24 to 29 minutes. The edges should look set and slightly pull away from the sides of the pan. When you insert a toothpick into the edge, it should come out clean or with just a few crumbs. The center will still look a bit soft and should have some thick batter on the toothpick, but it shouldn't be super jiggly.
Cool and serve: Let the brownies cool in the pan for at least 30 minutes before cutting. If you can wait longer, they'll slice much neater, but they're also delicious when they're still a bit warm and the Oreos are melty.
Store leftovers: Keep any leftover brownies in an airtight container at room temperature for 4 to 5 days, or refrigerate them for 5 to 7 days. You can enjoy them cold straight from the fridge or bring them back to room temperature.
Substitutions and Variations
No salted butter? You can use unsalted butter and add an extra pinch of salt to the dry ingredients.
Out of brown sugar? Use all granulated sugar instead. The brownies will be slightly less chewy but still delicious.
Don't have white vinegar? Apple cider vinegar works just as well and won't change the flavor noticeably.
Want to skip the food coloring? You can! The brownies will be more chocolate-brown, but they'll taste exactly the same.
Try different cookies. Golden Oreos, Mint Oreos, or even Chocolate Chip Cookies broken into pieces would all be great instead of regular Oreos.
Add cream cheese swirl. Beat 4 ounces of softened cream cheese with 2 tablespoons of sugar and 1 egg yolk, then swirl it into the batter before baking for a cheesecake twist.
Make them extra fudgy. Add ½ cup of chocolate chips along with the Oreos for even more richness.
Equipment For Red Velvet Oreo Brownies
- 9x9-inch baking pan: This size gives you the perfect thickness for fudgy Red Velvet Oreo Brownies. Metal or ceramic both work great.
- Parchment paper: Makes lifting the brownies out of the pan so much easier and cleanup a breeze.
- Large or medium mixing bowl: You'll do all your mixing in one bowl, so pick one that gives you enough room to whisk without making a mess.
- Whisk: Essential for getting that crackly top. A fork won't give you the same result.
- Toothpick: For testing doneness. Wooden toothpicks or a cake tester both work.
- Nonstick spray: Helps the parchment paper stick to the pan so it doesn't shift around when you pour in the batter.
Storage Tips For Red Velvet Oreo Brownies
Room temperature storage: Keep the Red Velvet Oreo Brownies in an airtight container on the counter for 4 to 5 days. They'll stay soft and fudgy.
Refrigerator storage: If you want them to last longer, refrigerate them in a covered container for up to a week. They'll firm up a bit when cold, which some people actually prefer.
Freezing: Cut the Red Velvet Oreo Brownies into individual squares, wrap each one in plastic wrap, then store them all in a freezer-safe bag or container for up to 3 months. Thaw at room temperature for about 30 minutes before eating.
Make-ahead tip: You can make the batter the night before, pour it into the prepared pan, cover it with plastic wrap, and refrigerate it overnight. Let it sit at room temperature for 15 minutes before baking, then add a couple extra minutes to the bake time.
Serving Suggestions
With vanilla ice cream: Warm up a Red Velvet Oreo Brownies for about 10 seconds in the microwave and top it with a scoop of vanilla ice cream. The contrast between warm brownie and cold ice cream is perfect.
As brownie sundaes: Cut them into squares and layer them in a glass with whipped cream, chocolate sauce, and crushed Oreos for an impressive dessert.
With coffee or milk: These pair beautifully with a hot cup of coffee in the afternoon or a cold glass of milk as an after-dinner treat.
For special occasions: Cut them into small squares and arrange them on a platter alongside Party Piñata Cupcakes or Strawberry Muffins for a colorful dessert spread.
Expert Tips
Don't skip the whisking step. Whisking the eggs and sugar for a full 2 minutes incorporates air and helps create that shiny, crackly top that makes these Red Velvet Oreo Brownies look bakery-quality.
Use gel food coloring, not liquid. Liquid food coloring can throw off the moisture balance in the batter and make the Red Velvet Oreo Brownies less fudgy. Gel gives you vibrant color without changing the texture.
Measure your flour correctly. Spoon the flour into your measuring cup and level it off with a knife. If you scoop directly from the bag, you'll pack in too much and the Red Velvet Oreo Brownies will be dry.
Don't overbake. The center should still look a little underdone when you pull them out. They'll continue cooking in the hot pan as they cool, and you want them fudgy, not cakey.
Line the pan with parchment overhang. Leave a couple inches of parchment paper hanging over two sides of the pan. Once the Red Velvet Oreo Brownies are cool, you can lift the whole thing out and cut it on a cutting board for perfectly even squares.
FAQ
Have red velvet Oreos been discontinued?
Red velvet Oreos come and go depending on the season and where you live. They're usually available around Valentine's Day, but regular Oreos work beautifully in this recipe and give you the same delicious chocolate cookie crunch. If you happen to find red velvet Oreos, go ahead and use them for an extra fun twist!
Can I put Oreos in my brownie mix?
Absolutely! You can fold broken Oreo pieces into any brownie batter, whether it's homemade or from a box mix. Just gently stir them in right before you pour the batter into the pan. They add great texture and make any brownie feel more special.
What flavour is red velvet actually?
Red velvet is a mild chocolate flavor with a slight tang from the vinegar or buttermilk. It's not as intensely chocolatey as a regular chocolate cake. The cocoa is there for flavor and color, but it's balanced with vanilla and that little bit of acid, which gives red velvet its signature soft, velvety crumb.
What are common red velvet baking mistakes?
The biggest mistake is using liquid food coloring instead of gel, which can make your batter too wet. Another one is overmixing the batter after you add the flour, which makes the Red Velvet Oreo Brownies tough instead of tender. Also, don't skip the vinegar! It reacts with the cocoa and gives red velvet that classic texture and flavor. My grandma always said the tang is what makes it special.
Related
Looking for other recipes like this? Try these:


Pairing
These are my favorite dishes to serve with Red Velvet Oreo Brownies


Red Velvet Oreo Brownies
Ingredients
Method
- Preheat your oven to 350°F (175°C). Spray a 9x9 baking pan with nonstick spray, then line with parchment paper to ensure easy removal.
- Melt the butter in a medium bowl. Whisk in both sugars until smooth. Then, whisk in the eggs and vanilla extract. Continue whisking for another 2 minutes to create the signature crackly top.
- Add the white vinegar and gel food coloring. Stir to incorporate until you reach your desired shade of red.
- Fold in the flour, cocoa powder, and salt until just combined. Fold in about two-thirds of the broken Oreos.
- Transfer the brownie batter into the prepared pan and spread evenly. Sprinkle the remaining Oreo pieces on top for a crunchy topping.
- Bake for 24 to 29 minutes. Insert a toothpick into the edges-if it comes out clean or mostly clean, and the center looks slightly underdone but not jiggly, it's ready.
- Allow the brownies to cool for at least 30 minutes before slicing, though they're also great served warm.


Leave a Reply