
Soft, chewy, and that deep, rich red that makes everyone stop and stare - these White Chocolate Red Velvet Cookies have been on my holiday baking list for two years running and honestly, I don't think they're leaving anytime soon. The first time I made a batch, I set them on the counter to cool and my neighbor Sofia knocked on the door before I even got to dip them. She took one look and said "those cannot be homemade."

The dough comes together with everyday ingredients, a good chill in the fridge, and a little patience - the same kind of patience I swear by when I'm waiting for my Mini Chocolate Éclairs to cool before filling them. If you love scratch-made treats that look almost too pretty to eat but taste even better than they look, you'll also want to bookmark my Strawberry Truffles and these gorgeous Chocolate Orange Brownies for your next baking weekend.
Why You'll Love This White Chocolate Red Velvet Cookies
These White Chocolate Red Velvet Cookies have that soft, chewy texture that holds up even after the white chocolate sets - still just as good the next day as the day they were baked. The dough mixes up with simple pantry staples, and the chilling time is completely hands-off, so you can make it the night before and just bake in the morning with zero stress.
If these White Chocolate Red Velvet Cookies hit the spot, I have a feeling you'll enjoy these too. My Pistachio Tart has that same kind of beautiful, special-occasion look with a completely scratch-made base. The Orange Mousse Cups are light, bright, and a wonderful contrast to anything chocolate. And if you're in full holiday baking mode, the Mango Mousse Cake is a showstopper that's easier to put together than it looks.
Jump to:
- Why You'll Love This White Chocolate Red Velvet Cookies
- White Chocolate Red Velvet Cookies Ingredients
- How to Make White Chocolate Red Velvet Cookies
- Substitutions and Swaps
- Equipment For White Chocolate Red Velvet Cookies
- How to Store These White Chocolate Red Velvet Cookies
- Serving Suggestions
- Expert Tips
- FAQ
- Related
- Pairing
- White Chocolate Red Velvet Cookies
White Chocolate Red Velvet Cookies Ingredients
Here's a quick look at what goes into these White Chocolate Red Velvet Cookies and why each ingredient matters.
See Recipe Card Below This Post For Ingredient Quantities
Dry Ingredients
- All-purpose flour : Forms the structure of the cookies and helps them bake up soft and chewy rather than cakey or crispy.
- Unsweetened natural cocoa powder : Gives the cookies that classic red velvet undertone. Natural cocoa (not Dutch-process) keeps the color brighter.
- Baking soda : Helps the cookies rise just enough and keeps the texture tender.
- Salt : Balances the sweetness and makes all the other flavors pop.
Wet Ingredients
- Unsalted butter, softened : Adds richness and gives the cookies their buttery, melt-in-your-mouth quality. Room-temperature butter creams much better than cold butter, so don't skip that step.
- Packed light or dark brown sugar : Adds moisture and a subtle caramel depth. Packing it into the measuring cup matters here - loose brown sugar will throw off the texture.
- Granulated sugar : Helps the edges get just slightly crisp while the centers stay soft.
- Large egg, room temperature : Binds the dough together and adds moisture. Room temperature eggs blend in more smoothly.
- Milk or buttermilk : Loosens the dough just enough without thinning it out. Buttermilk adds a tiny bit of tang that plays beautifully against the sweetness.
- Pure vanilla extract : Rounds out all the flavors. Don't skip it.
- Gel red food coloring : Gives these White Chocolate Red Velvet Cookies their signature bold red color. Gel coloring is much more concentrated than liquid, so a little goes a long way. Add more if you want an even deeper red.
For Dipping
- Pure white chocolate, coarsely chopped : Real white chocolate (with cocoa butter in the ingredient list) melts smoother and tastes so much better than chips or candy coating. Coarsely chopping it helps it melt evenly.
- Sprinkles : Totally optional, completely worth it. Add them right after dipping before the chocolate sets.
How to Make White Chocolate Red Velvet Cookies
Here are all the steps, in order, exactly as you need them.
Mix dry ingredients: Whisk together the flour, cocoa powder, baking soda, and salt in a medium bowl until evenly combined. Set the bowl aside.
Cream butter and sugars: Using a hand mixer or stand mixer with a paddle attachment, beat the softened butter, brown sugar, and granulated sugar on medium speed until the mixture looks lighter in color and feels creamy, about 3 minutes. Don't rush this step - it's what gives the cookies their texture.
Add egg and vanilla: Beat in the egg and vanilla extract on high speed for about 1 minute until fully combined. Scrape down the sides and bottom of the bowl as needed so everything gets incorporated.
Finish the dough: Add the dry ingredients, milk, and red food coloring to the bowl. Mix on low speed until the dough comes together. It will be sticky - that's normal. Check the color and add a little more food coloring if you want a deeper, brighter red.
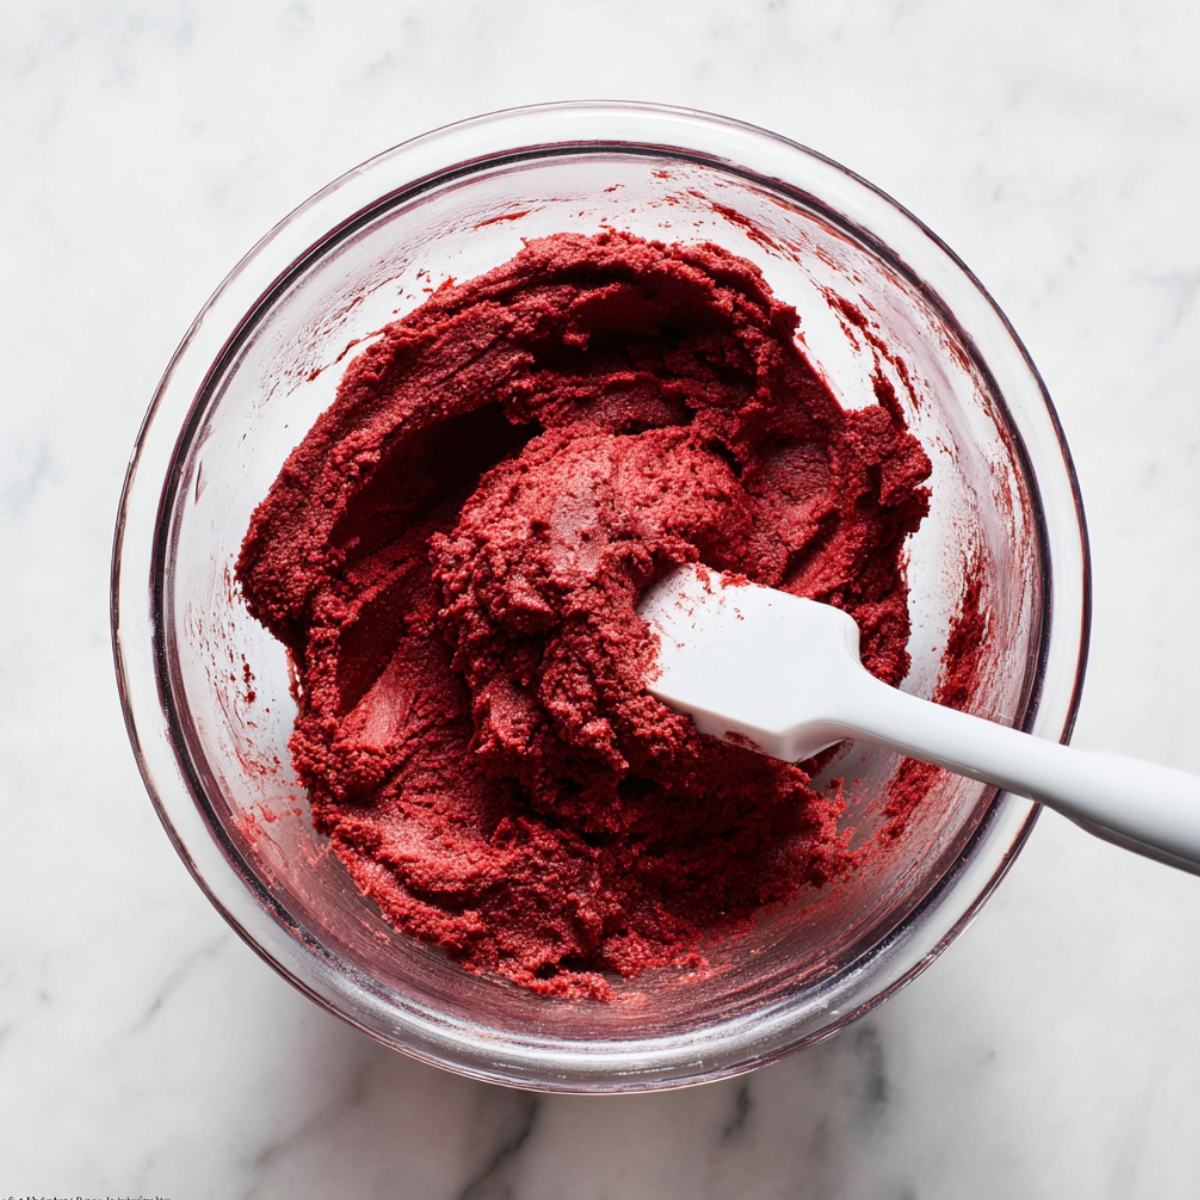
Chill: Cover the dough and refrigerate for at least 2 hours, or up to 3 days. If you've chilled the dough longer than a couple of hours, let it sit at room temperature for about 15 minutes before scooping so it's easier to work with.
Prepare oven: Preheat your oven to 350°F (177°C). Line your baking sheets with parchment paper or silicone baking mats.
Shape cookies: Scoop approximately 1½ tablespoons of dough per cookie, roll each one into a ball, and arrange them on the prepared baking sheets about 3 inches apart. They'll spread a bit.
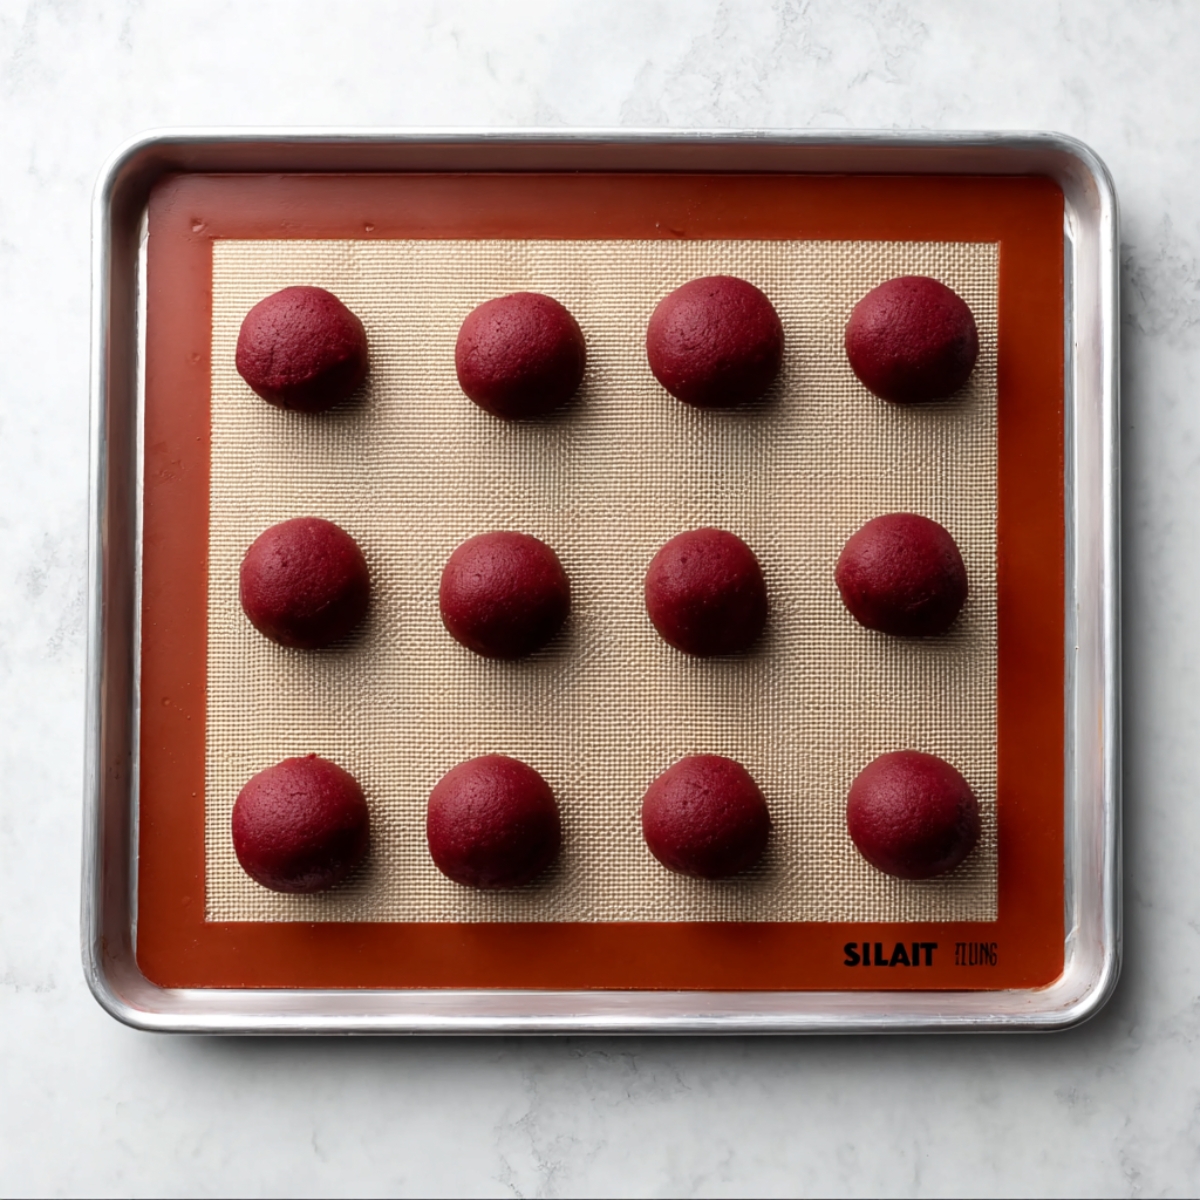
Bake: Bake for 11 to 13 minutes. You're looking for edges that look set and centers that still appear soft - they'll finish setting up as they cool. Don't overbake or you'll lose that chewy texture.
Cool: Let the cookies rest on the baking sheet for 5 minutes before moving them to a wire cooling rack. They need to cool completely before dipping or the chocolate won't set properly.
Dip in white chocolate: Melt the chopped white chocolate in a microwave-safe bowl using 15-second intervals, stirring after each one until it's fully smooth. If the chocolate seems too thick, stir in 1 teaspoon of vegetable oil to thin it slightly. Dip half of each cooled cookie into the melted chocolate and immediately top with sprinkles before it starts to set.
Set: Let the chocolate harden completely at room temperature, or pop the cookies in the refrigerator to speed up the process.
Store: Keep the White Chocolate Red Velvet Cookies covered at room temperature for up to 3 days, or refrigerate for up to 1 week.
Substitutions and Swaps
Buttermilk vs. milk: Buttermilk is the preferred option here and adds a slight tang, but regular whole milk works fine.
Red food coloring: Gel coloring gives the strongest, most consistent color. If you only have liquid food coloring, you may need more - start with 1 teaspoon and go from there. You can also use beet powder as a natural alternative, though the color won't be as vivid.
White chocolate: Real white chocolate bars (not chips) melt the best and taste the richest. If you need to use white chocolate chips, add a teaspoon of coconut oil when melting to help them smooth out.
Brown sugar: Light or dark brown sugar both work. Dark brown sugar adds a slightly deeper, more molasses-forward flavor.
Sprinkles: Nonpareils, sanding sugar, or holiday-specific sprinkles all work beautifully. Or skip them entirely for a cleaner look.
Equipment For White Chocolate Red Velvet Cookies
- Medium mixing bowl
- Hand mixer or stand mixer with paddle attachment
- Measuring cups and spoons
- Baking sheets
- Parchment paper or silicone baking mats
- Medium cookie scoop
- Wire cooling rack
- Microwave-safe bowl
- Rubber spatula
How to Store These White Chocolate Red Velvet Cookies
Room temperature: Store in an airtight container for up to 3 days. Place a sheet of parchment between layers to protect the white chocolate coating.
Refrigerator: These keep well refrigerated for up to 1 week. Let them sit at room temperature for about 10 minutes before serving if you prefer them softer.
Freezer: You can freeze the baked, undipped White Chocolate Red Velvet Cookies for up to 2 months. Thaw at room temperature, then dip in white chocolate fresh.
Freezing the dough: The cookie dough can be frozen in scooped balls for up to 2 months. Bake straight from frozen, adding 1 to 2 minutes to the bake time.
Serving Suggestions
With hot cocoa: The combination of red velvet and white chocolate alongside a mug of rich hot cocoa is cozy in the best possible way. Perfect for a slow weekend morning.
On a holiday cookie tray: These White Chocolate Red Velvet Cookies are eye-catching enough to anchor any dessert spread. Pair them with buttery shortbreads and something nutty for variety.
Boxed as gifts: Stack them in a clear treat box with tissue paper and they look like they came from a boutique bakery. Wrap the box with a ribbon and you've got a genuinely impressive homemade gift.
With vanilla ice cream: Sandwich a scoop of vanilla ice cream between two cookies and press gently. The white chocolate dip on the outside makes it look as good as it tastes.
Expert Tips
Don't skip the chill. Two hours minimum is not just a suggestion. Chilling the dough solidifies the butter, which means the White Chocolate Red Velvet Cookies spread less and bake up thicker. The flavors also develop more fully during that rest time.
Use gel food coloring, not liquid. Liquid food coloring dilutes the dough and can affect the texture. Gel coloring is concentrated, so you get that bold red without adding extra liquid.
Chop the white chocolate yourself. Pre-chopped chocolate or chips can have stabilizers that make melting uneven. Chopping fresh bars from scratch gives you the smoothest, most glossy dip.
FAQ
How do you make soft White Chocolate Red Velvet Cookies?
Use brown sugar, chill the dough, and pull the White Chocolate Red Velvet Cookies out when the centers still look slightly underdone. They firm up as they cool - that's the trick.
Why do red velvet cookie doughs need to chill?
Chilling firms up the butter so the cookies don't spread too thin. It also makes the sticky dough much easier to scoop. Two hours minimum, overnight is even better.
Can red velvet cookies be frozen?
Yes! Freeze baked, undipped White Chocolate Red Velvet Cookies for up to 2 months. Thaw at room temperature, then dip in white chocolate fresh. The raw dough freezes well too - just bake straight from frozen and add 1 to 2 extra minutes.
What is the best white chocolate for dipping cookies?
Use real white chocolate bars, not chips. Look for cocoa butter in the ingredient list. Chips have stabilizers that make them clumpy. If that's all you have, stir in a teaspoon of oil when melting to smooth it out.
Related
Looking for other recipes like this? Try these:




Pairing
These are my favorite dishes to serve with White Chocolate Red Velvet Cookies



White Chocolate Red Velvet Cookies
Ingredients
Method
- Whisk together the flour, cocoa powder, baking soda, and salt until evenly combined, then set the bowl aside.
- Beat the softened butter with both sugars until light and fluffy, about 3 minutes. Mix in the egg and vanilla until smooth, scraping the bowl as needed.
- Add the dry mixture along with the buttermilk and red food coloring. Mix on low speed just until a soft, sticky dough forms. Cover and refrigerate for 2 hours or until firm enough to scoop.
- About 15 minutes before baking, remove the chilled dough if it has been refrigerated for several hours. Preheat the oven to 350°F (177°C) and line baking sheets with parchment paper.
- Portion about 1½ tablespoons of dough for each cookie, roll into balls, and arrange them about 3 inches apart on the prepared baking sheets.
- Bake for 11-13 minutes until the edges are set while the centers remain soft. Let the cookies rest on the baking sheet for 5 minutes before transferring them to a wire rack to cool completely.
- Place the chopped white chocolate into a microwave-safe bowl and melt in 15-second intervals, stirring between each round until smooth. Stir in the vegetable oil only if the chocolate needs thinning.
- Dip half of each cooled cookie into the melted white chocolate, decorate immediately with sprinkles, and allow the coating to harden completely at room temperature or in the refrigerator before serving.
- Store the finished cookies in an airtight container for up to 3 days at room temperature or up to 1 week in the refrigerator.




Leave a Reply